


Maintaining clean, level cutting lines across expansive turf often comes down to the condition and pressure of your mower tires rather than engine horsepower alone. Operating a riding tractor or zero-turn with dry-rotted sidewalls, slow rim leaks, or unseated tire beads causes noticeable chassis tilt that immediately ruins deck pitch and scalps uneven terrain. Learning how to mount a lawn mower tire in your own garage saves substantial repair shop labor while restoring predictable traction and deck alignment. Proper pneumatic tire mounting ensures consistent ground tracking, especially when navigating damp grass or operating mowers designed for steep hills where wheel slippage quickly destroys delicate sod.
Small lawn tractor and zero-turn wheels present distinct mechanical challenges compared to standard automotive or light-truck rims. Because lawn mower wheels measure anywhere from 6 to 12 inches in diameter, the narrow drop center leaves very little clearance for maneuvering stiff, multi-ply rubber beads over the rim flange. Without proper technique, equipment operators often damage aluminum rims, gouge bead sealing surfaces, or pinch inner tubes during installation. Understanding the role of drop-center geometry, high-lubricity mounting soap, and specialized tire spoons allows property owners to mount tubeless and tube-type turf tires cleanly without damaging wheels or risking sudden bead unseating during heavy turning maneuvers.
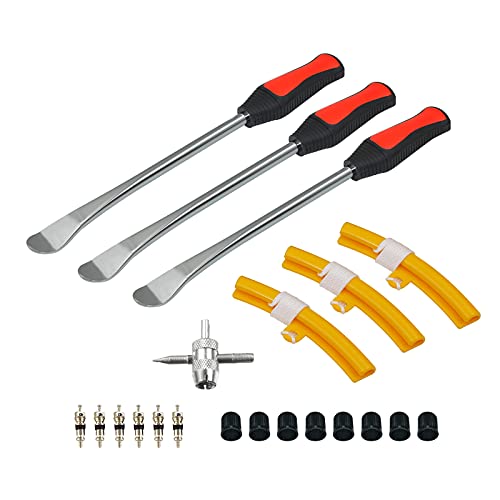
Pros
- Complete kit includes tire spoons, rim protectors, valve tools, and caps – no need to buy extras.
- Drop forged steel spoons are strong and rust-resistant – built to last for many tire changes.
- Comfortable rubber handles improve grip and control during tire prying.
- Works well for small to medium lawn tractor and riding mower tires (up to 16-18 inch diameter).
- Very affordable compared to shop labor costs – pays for itself after one tire change.
Cons
- Spoons are 11.4 inches long – may not provide enough leverage for larger tractor or zero-turn mower tires without additional effort.
- Rim protectors are plastic and may wear out after repeated use on heavy or tight tires.
- Basic set does not include a tire bead breaker – you may need a separate tool for stubborn beads on lawn mower tires.
For homeowners who maintain their own lawn tractors, riding mowers, or zero-turn mowers, changing a flat tire can be a hassle. The Handfly Tire Spoon Tool Set offers a practical, affordable solution for DIY tire removal and installation right in your garage or driveway. This kit is designed for small to medium tires commonly found on lawn equipment, ATVs, motorcycles, and even wheelchairs, making it a versatile addition to any homeowner's tool collection.
Based on product specifications and user feedback, the three drop forged steel tire spoons provide good leverage for prying tires off rims. The rubber grip handles make the process more comfortable than bare metal spoons, reducing hand strain during repetitive prying motions. The included rim protectors are a thoughtful addition – they help prevent scratches and damage to your mower's painted or polished rims, which is especially important for newer machines.
Build quality appears solid for the price point. The steel spoons have a polished chrome finish that resists rust, though they should be wiped clean after use to maintain longevity. The valve tool and extra valve cores/caps are handy for replacing worn valve stems or adjusting tire pressure. Many homeowners may prefer this complete kit over buying individual tools, as it covers the basics for a tire change.
Setup is straightforward – the spoons and protectors are ready to use out of the box. However, this set does not include a bead breaker, so you may need additional tools (like a tire bead breaker or a heavy-duty pry bar) for tires with stubborn beads, especially on larger lawn tractor tires. The 11.4-inch spoon length is adequate for most riding mower tires (15-18 inch) but may require extra effort for larger zero-turn or garden tractor tires.
Some users find that the plastic rim protectors can wear down after several uses, especially on tight-fitting tires. For frequent tire changes, consider replacing them with metal or thicker plastic protectors. Also, the basic set does not include a tire gauge or air compressor – you'll need those separately to complete the job.
Overall, the Handfly Tire Spoon Tool Set is a good value for homeowners who occasionally need to change a lawn mower or tractor tire. It's not a heavy-duty professional set, but for DIY maintenance on small to medium equipment, it gets the job done without breaking the bank. If you're a budget-conscious homeowner looking to save on shop labor costs, this kit is a practical investment.

Pros
- Longer 14.5-inch spoons offer better leverage compared to standard 11-inch tools
- Sturdy drop-forged steel feels solid and durable for repeated use
- Chrome finish resists rust and corrosion in damp garage environments
- Includes extra valve stems and a valve tool—good value for the price
- Compact storage bag keeps the set tidy and portable
Cons
- Spoons may be too long for very tight tire bead seating on small wheels
- Chrome finish can chip over time with heavy use
- Bag is basic and may not hold up to long-term storage in rough conditions
The Dr.Roc 14.5 Inch Tire Spoon Lever Iron Tool Kit is a practical set designed for homeowners who maintain their own lawn mowers, garden tractors, dirt bikes, or ATVs. This kit includes three tire spoons, plus a selection of valve stems and a 4-way valve tool—everything you need for basic tire changes on small outdoor power equipment.
The standout feature here is the 14.5-inch spoon length. Most standard tire spoons are around 11 inches, and the extra length on these Dr.Roc spoons provides noticeably better leverage. This makes it easier to pry off stubborn tires from lawn mower wheels or garden tractor rims, especially when dealing with tight bead seating. The spoons are made from drop-forged steel with a polished chrome finish, which helps resist rust and corrosion in a typical garage or shed environment.
In terms of build quality, the spoons feel solid and well-balanced. The handles have a comfortable grip, and the spoon edges are smooth—an important detail to avoid pinching or damaging inner tubes during tire changes. The kit also includes four TR412 and two TR413 valve stems, plus a 4-way valve tool with four valve caps. This is a nice bonus for the price, saving you a separate trip to the hardware store.
Setup is straightforward: the tools come in a compact oxford storage bag that keeps everything organized. The bag is basic but functional for garage storage or tossing in a truck bed. For maintenance, the chrome finish wipes clean easily, and the steel construction should hold up well to occasional use. Some users may find the spoons a bit long for very small wheels, but for most lawn mower and garden tractor applications, the length is a benefit.
One realistic limitation is that the chrome finish can chip with heavy or frequent use, and the storage bag is not heavy-duty. However, for the price point, these are minor concerns. The kit is best suited for DIY homeowners who change tires a few times a year, not for professional shops running high-volume tire changes.
Overall, the Dr.Roc tire spoon kit offers good value for anyone who needs to change tires on lawn mowers, garden tractors, ATVs, or dirt bikes. It provides the leverage and durability needed for occasional use, and the included valve stems and tool make it a complete starter set. If you're a budget-conscious homeowner looking to handle your own tire repairs, this kit is a solid choice.

Pros
- Aggressive tread pattern provides excellent grip on wet grass and uneven ground
- High load capacity (1,710 lbs) suits heavy mowers and occasional hauling tasks
- Simple no-rim change installation reduces downtime and cost
Cons
- Not rated for highway use, so strictly for off-road mowing and property use
- May run slightly wider than some factory tires, so check clearance on your mower
- Some users note the rubber compound feels stiffer initially, requiring a brief break-in period
The Marastar 24120-TO Turf Traction tire is a straightforward replacement rear tire designed for riding lawn mowers, zero-turn mowers, and lawn tractors. If you've worn out the original tires on your mower or need better traction on sloped or damp ground, this 24x12.00-12 tire offers a practical upgrade without requiring new rims. It's especially well-suited for homeowners with medium to large properties who mow over uneven terrain, light mud, or even patchy snow during fall cleanup.
Performance-wise, the dual tread pattern is the standout feature. The Turf Master ribs on the tire shoulders help keep the mower stable during turns, reducing the chance of turf damage. Meanwhile, the Turf Lug center treads bite into soft soil or wet grass for forward traction. Many users find this combination effective for navigating gentle slopes and maintaining momentum on damp mornings. The tubeless pneumatic design also provides a cushioned ride, which can reduce vibrations felt through the mower's frame.
Build quality is solid for the price point. The 4-ply rating means the tire can handle the weight of a heavy riding mower—up to 1,710 pounds—without sidewall bulges or premature wear. The rubber compound feels durable, though some initial stiffness may be noticeable before the tire fully seats and flexes. For most homeowners, this tire will last several mowing seasons with proper inflation and storage.
Installation couldn't be easier: you just remove the old tire from the rim, mount the Marastar, and inflate. No specialty tools or tire machines needed. Storage is the same as any mower tire—keep it out of direct sun and inflated when not in use. Maintenance mainly involves checking air pressure regularly (around 15-20 psi for most riding mowers) and inspecting for punctures after rough going.
On the downside, this tire is not intended for highway or street use, so don't plan on driving your mower down the road. Also, because it's slightly wider than some factory tires, you should measure your mower's wheel clearance before buying. A few users mention the tire runs slightly smaller in diameter than expected, possibly affecting ground clearance, though this is not widespread.
If your current mower tires are bald, cracked, or losing traction, the Marastar 24x12.00-12 is a cost-effective replacement that won't break the bank. It delivers reliable grip for daily mowing, occasional leaf duty, and even light snow clearing. Just double-check your tire size and clearance before ordering, and you'll be back to mowing with confidence.

Pros
- Effectively prevents tire damage from heat and hard surfaces, a common issue for lawn mower owners
- Easy to install - simply position under the tire; no tools required
- Durable TPR material withstands weather and wear without cracking
- Stable on various surfaces thanks to anti-slip base and bolt fittings
- Affordable price point for the potential savings on tire replacement
Cons
- Only fits tires with outer diameter between 13 and 17 inches, limiting compatibility
- May not be necessary for users who store mowers on soft ground or always keep them on gravel
- Some users may find the ramp thickness (2.4 inches) too low for certain tire sizes to fully relieve pressure
If you own a lawn mower or garden tractor with flat-free or tubeless tires, you have likely faced the issue of tires flattening or bursting when parked on hot concrete or asphalt for extended periods. The GICOOL Mower Tire Saver Ramp offers a simple, low-cost solution to this problem. Designed for tires with an outer diameter of 13 to 17 inches, this ramp lifts the tire slightly off hard surfaces, preventing heat buildup and pressure points that cause premature tire failure.
Based on product specifications, the ramp works by supporting the tire's sidewalls and tread while keeping it elevated. This helps maintain the tire's roundness, which is key to extending its life and avoiding costly replacements. The static load capacity is rated at 1000 lbs, meaning it can support even heavy riding mowers and lawn tractors without issue. For homeowners who park their equipment in garages, driveways, or on patios, this ramp can be a worthwhile investment.
Build quality is a highlight here. The ramp is made from TPR (Thermoplastic Rubber), a material that combines flexibility with wear resistance. It feels rubbery and grippy, which contributes to its anti-slip performance. The base is wide and textured, and the integrated bolt fittings allow you to secure the ramp to smooth surfaces if needed. Many users appreciate that it stays put on concrete, asphalt, or even rough terrain without sliding around.
Setup is straightforward - you just slide the ramp under the tire until the tire rests on it. No assembly or tools required. The lightweight design (1 lb) makes it easy to move and reposition. For seasonal storage, you can hang the ramp on a wall hook when not in use. The low profile (2.4 inches tall) means it doesn't create a significant tripping hazard, though it's still wise to mark its location if left in a walkway.
One realistic limitation is that the ramp is only compatible with tires between 13 and 17 inches in outer diameter. If your mower uses smaller or larger tires, this won't work. Also, if you store your equipment on soft ground like grass or dirt, the ramp may not be necessary since the ground provides natural pressure relief. Some users might find the 2.4-inch lift insufficient for completely unloading the tire, but for most flat-free and tubeless tires, it seems adequate based on product information.
Overall, the GICOOL Mower Tire Saver Ramp is a practical accessory for anyone keeping a lawn mower or garden tractor on a hard surface for more than a few days. It is especially useful during hot summer months or for winter storage. At an affordable price, it can help you avoid the hassle and expense of replacing damaged tires. If you have compatible tires and want to extend their life, this ramp is a simple solution worth considering.
Step-by-Step Technical Guide on How to Mount a Lawn Mower Tire
Mounting a lawn mower tire requires patience, mechanical leverage, and an understanding of small-diameter rim physics. Small utility rims lack the deep drop centers found on passenger vehicles, which makes wrestling stiff rubber over wheel flanges notoriously challenging. Applying systematic leverage, proper bead lubrication, and the right tire-changing tools transforms this frustrating chore into a manageable workshop task. Resolving rim sealing surfaces and matching tire specifications correctly ensures your machine delivers smooth cutting performance across your lawn without leaking air or slipping on slopes.
Understanding Mower Rim Architecture and Drop-Center Physics
Lawn mower and garden tractor wheels differ significantly from standard automotive rims due to their compact diameter and tight internal clearances. Most residential and commercial mowers use wheel rims between 6 and 12 inches in diameter, which leaves a very narrow central well known as the drop center. When mounting or dismounting a tire, placing the opposite bead inside this drop center is what creates the slack needed to lift the working bead over the outer flange. Failing to push the bottom bead into this recessed valley creates excessive bead tension, which often leads to torn rubber or bent steel rim lips.
Tubeless mower wheels rely entirely on an airtight mechanical seal between the smooth rubber bead and the inner metal rim seat. Any corrosion, dried grass debris, or flaking paint along this sealing bead seat will cause chronic slow leaks that soft tire pressures cannot overcome. Stamped steel rims are common on residential lawn tractors, while cast aluminum or heavy-gauge welded steel assemblies appear on commercial zero-turn equipment. Recognizing your wheel material helps prevent irreversible gouging when applying mechanical leverage with metal tire tools.
Safety Isolation, Mechanical Preparation, and Essential Tools
Safe tire replacement starts with isolating the mower on a solid, level concrete floor to prevent unintended roll or tipping during wheel removal. Set the parking brake firmly, disengage the electric PTO switch, shut down the engine, and remove the ignition key or disconnect the spark plug wire. Jack up the mower frame securely using rated automotive jack stands under solid chassis contact points rather than relying on a hydraulic floor jack alone. Once the wheel is off the spindle or axle hub, remove the valve core completely with a 4-way valve tool to exhaust all compressed air before attempting bead breaking.
Having the correct specialized gear on hand prevents rim destruction and cuts installation time dramatically. Dedicated tire spoons, such as the Dr.Roc 14.5 inch Perfect Leverage Tire Spoon Lever or the Handfly Tire Spoons Tool Set, provide the curved, polished tips required to manipulate rubber beads without cutting inner liners. Screwdrivers, pry bars, and sharp-edged tools should never be used on mower wheels because they slice the rubber bead wire and leave deep burrs on metal sealing lips. You will also need dedicated rim edge protectors, a spray bottle of commercial tire mounting lubricant or concentrated dish soap solution, a ratchet strap, and a reliable air compressor.
Breaking the Bead on Stubborn Utility Wheels
Breaking an old tire bead that has been bonded to a mower rim for several seasons is frequently the most physically demanding stage of the job. Moisture, heat, and acidic grass clippings often cause the rubber to oxidize and adhere firmly against the steel rim seat. Commercial slide-hammer bead breakers or bench-mounted manual tire changers make quick work of this separation, but DIY maintainers can accomplish the same result using common shop tools. A heavy bench vise fitted with protective wood blocks can compress the tire sidewall immediately adjacent to the rim lip until the bead pops into the drop center.
Alternatively, placing a wide wooden 2×4 block flat against the sidewall close to the rim and carefully driving a vehicle tire or utilizing a weighted lever arm breaks the bead cleanly without warping the wheel. Never strike the wheel rim directly with a steel sledgehammer, as this bends the flange out of round and prevents future tubeless seals. Once the outer bead breaks free, flip the wheel over and repeat the exact process on the inner rim bead. Inspect the inner wheel barrel thoroughly, cleaning away rust scale and rubber remnants using a wire brush and fine-grit emery cloth to guarantee a smooth contact plane for the replacement tire.
Step-by-Step Procedure for Mounting the Replacement Tire
Begin the physical mounting process by inspecting the new tire for directional tread arrows molded into the sidewall casing. Directional chevron or V-bar turf tires must rotate forward in the direction of machine travel to clean out damp soil and provide optimal traction. Thoroughly coat both the inner and outer beads of the new tire, as well as the outer lips of the wheel rim, with generous amounts of tire mounting lubricant or thick soapy water. Never substitute petroleum-based grease, motor oil, or WD-40, because petroleum degrades vulcanized rubber compounds and destroys the bead core over time.
Place the wheel flat on a secure workbench or rubber mat with the outer valve stem side facing upward. Angle the bottom bead of the new tire over the top rim flange, pushing it downward diagonally so that one section drops immediately into the center rim well. In many cases, a well-lubricated bottom bead can be pushed completely over the rim using simple downward hand pressure and knee weight. If resistance builds along the final 3 inches, slide a smooth tire spoon between the bead and rim, taking care to lever the rubber gently over the flange without pinching the bead edge.
Mounting the top bead requires precise tool coordination and careful leverage control. Clip flexible rim edge protectors over the exposed wheel lip to prevent cosmetic scratching or metal gouging during tool levering. Insert the curved tip of your first tire spoon beneath the top bead, levering a small section of rubber downward into the rim well. Hold that spoon stationary while inserting a second spoon roughly two to three inches away, taking small, bite-sized increments around the perimeter. As you work toward the final quadrant, press the opposite side of the tire down into the drop center; this slack allows the remaining bead to pop over the rim with minimal lever effort.
Seating Stubborn Beads and Inflating Tubeless Tires
Seating the bead on small tubeless mower tires can test your patience because the uninflated tire often rests loosely between the rim shoulders, allowing air to escape freely. To overcome this gap, remove the internal Schrader valve core from the valve stem before connecting your air line. Removing the core maximizes volumetric air flow into the tire carcass, generating the rapid internal pressure spike needed to drive the rubber beads outward against the rim seats. Ensure the bead contact areas are soaking wet with soapy water, which acts as a fluid barrier and reduces mechanical friction during the outward expansion.
When high air volume alone fails to seat the rubber, wrapping a standard heavy-duty ratchet strap around the center of the tire tread provides the necessary mechanical assistance. Tightening the ratchet strap along the circumference compresses the tire crown inward, which forces the flexible sidewalls and beads outward against the rim flanges. Apply compressed air through a clip-on chuck while observing the bead movement carefully. As the beads expand and contact the rim shoulders, release and remove the ratchet strap immediately to prevent dangerous over-pressurization of the constrained tire carcass.
Continue inflating until both beads seat against the rim lips with two loud, audible pop sounds. Never exceed the maximum seating pressure embossed on the tire sidewall, which is typically capped at 30 to 35 PSI on utility tires. Once both beads have fully snapped into position, disconnect the air supply, quickly reinstall the Schrader valve core using your 4-way tool, and adjust the internal pressure down to the mower manufacturer operating specification, which usually falls between 10 and 14 PSI for rear drive tires and 12 to 16 PSI for front casters.
Sizing Standards, Ply Ratings, and Traction Considerations
Selecting the proper replacement tire requires deciphering the three-number sizing format stamped on the sidewall, such as 24×12.00-12 on heavy-duty drive assemblies. On a tire labeled like the Marastar 24120-TO Turf Traction 24×12.00-12 Tire, the first number indicates the total mounted outer tire height in inches, the middle number specifies the tire section width across the tread, and the final number denotes the rim diameter. Installing an incorrect outer diameter alters ground speed calibration, causes chassis raking, and throws off mower deck leveling adjustments. When working on older machinery or ordering replacement wheels, consulting a equipment age and serial number reference helps verify original factory wheel specifications and rim hub offsets.
Carcass ply rating plays a critical role in puncture resistance, load capacity, and tire installation stiffness. Standard residential riding mowers typically come equipped with 2-ply pneumatic tires, which offer a flexible, forgiving ride over minor turf irregularities but remain vulnerable to thorns and sharp yard debris. Upgrading to a 4-ply rated tire increases structural sidewall stability and load capacity up to 1,700 pounds or more, which proves beneficial when pulling aerators or operating zero-turns on rolling acreage. However, 4-ply casings feature significantly stiffer beads, making proper drop-center technique and long 14.5-inch tire spoons essential during manual mounting.
Tread profile selection dictates whether your machine maintains traction on wet turf or tears delicate grass roots during zero-radius pivot maneuvers. Classic ribbed and square-shoulder turf tires distribute machine weight evenly to protect soft lawn surfaces, but they lose steering authority on damp slopes. Modern hybrid treads combine standard turf shoulder blocks for lateral stability with aggressive center lug patterns that deliver forward biting power on hills without scuffing manicured sod. Matching the tire tread pattern and inflation rate across both drive wheels prevents uneven hydrostatic drag and erratic steering tracking.
Deck Leveling Calibration and Post-Mounting Inspection
Mounting a new tire directly impacts your mower cutting deck geometry and overall cut quality. Even identical replacement tires can exhibit slightly different rolling circumferences compared to older, worn rubber on the opposite side of the machine. Furthermore, a variance of just one to two PSI between rear drive tires alters the physical height of the cutting deck by as much as a quarter inch. After torquing wheel lug nuts or installing axle keyways and retaining clips, park the mower on an unconditionally flat concrete slab to measure static tire rolling height before engaging the cutting blades.
Re-leveling the mower deck requires adjusting the lateral deck hanger linkages and front draft arms to establish the proper positive pitch. Measure the blade cutting tips from the concrete surface, ensuring the cutting height matches side-to-side within an eighth of an inch. Set the front blade tip between an eighth and a quarter inch lower than the rear trailing tip to prevent double-cutting, deck clumping, and excessive horsepower draw. Taking the time to calibrate deck rake immediately after mounting fresh tires guarantees a pristine, uniform turf finish without uncut stragglers or unsightly scalping.
Tire Care, Storage Protection, and Bead Integrity Checks
Conducting a thorough soap-and-water leak test on your newly mounted wheel reveals microscopic bead leaks before the machine returns to turf duty. Spray a 50/50 mixture of water and liquid dish soap around both bead perimeters and directly across the valve stem assembly. Watch closely for expanding micro-bubbles, which signal an unseated bead section, pinched rubber, or a leaking Schrader valve core. If continuous bubbling occurs along the rim flange, deflate the tire completely, break the bead loose, apply additional mounting lubricant, and reseat the tire under controlled air pressure.
Protecting mower tires during off-season winter storage prevents sidewall dry rot, flat-spotting, and premature casing failure. Leaving heavy zero-turn mowers or garden tractors parked on bare cold concrete for months creates permanent flat spots on pneumatic rubber and pulls moisture out of the compound. Utilizing specialized storage supports such as the GICOOL Mower Tire Saver Ramp for 13-17″ Flat Free cradles tire contours and keeps the rubber elevated away from hard garage floors. Maintaining baseline storage air pressure and sheltering tires from direct ultraviolet sunlight preserves rubber flexibility, ensuring your freshly mounted turf tires deliver years of dependable mowing performance.
Mastering the mechanical steps of tire mounting eliminates costly dealer visits and keeps your outdoor power equipment operating at peak efficiency throughout the growing season. Taking deliberate care during bead breakdown, utilizing proper tire spoons, and establishing correct post-installation air pressures protects both your rims and your lawn. With the right workshop tools and patience, any equipment owner can mount and seat mower tires safely and effectively.


Write Your Review
No reviews yet. Be the first to share your experience!