


Crisp turf borders define the boundary between manicured turf and landscape beds, yet power trimmers often scalp soil or sling loose mulch across finished grass. Learning how to edge with a shovel gives property owners total control over border definition without the mechanical noise, flying debris, or erratic trenching of motorized string trimmers. A sharp, square spade cleanly severs stoloniferous grass runners, creating a distinct physical barrier that blocks weed invasion and maintains sharp visual separation. When paired with rear-discharge mower options for clean turf, manual trenching keeps clipping discharge away from exposed decorative mulch beds.
Establishing an authentic English landscape edge requires understanding turfgrass growth patterns, soil compaction levels, and proper ergonomic leverage. A straight spade blade penetrates root zones vertically, preventing the creeping roots of Bermuda, Kentucky bluegrass, and tall fescue from encroaching on planting zones. Mastering this physical technique provides a durable, professional finish that lasts throughout the growing season with minimal touch-ups. With the proper foot placement, blade pitch, and trench clean-out routine, manual edging transforms ordinary yard perimeters into clean, structured landscape features.




Mastering the Manual Spade Cut for Clean Lawn Boundaries
Understanding how to edge with a shovel begins with recognizing the mechanical difference between a surface trim and a subterranean soil trench. While powered bladed edgers create a shallow slit along concrete walkways, a manual spade carves a true physical drop-off known as an English lawn edge. This vertical boundary halts creeping root networks before they penetrate root zones in adjacent garden beds, preserving defined lines throughout the entire growing season. Executing this cut properly requires consistent blade orientation, steady foot pressure, and systematic soil evacuation along the perimeter.
Selecting the Proper Shovel Geometry for Clean Edging Cuts
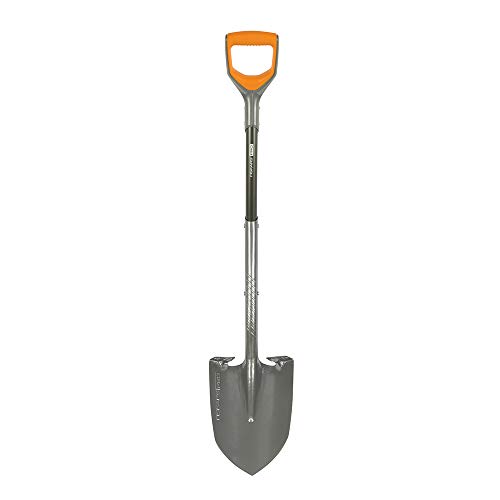
Traditional round-point digging shovels feature curved, dished bowls that create uneven, concave gouges when driven into turf edges. A dedicated edging spade or square digging shovel features a flat, straight cutting blade that creates consistent planar cuts through dense turfgrass sod. Tools such as the Fiskars 44″ Pro Garden Shovel utilize heavy-gauge flat steel with a sharpened working edge, allowing the operator to slice cleanly through root mats without tearing turf crowns. The flat profile ensures that each consecutive cut aligns seamlessly with the previous plunge, forming an unbroken, crisp border line.
Handle design and blade construction directly dictate cutting leverage and operator fatigue over extended yard borders. Shovels equipped with rigid aluminum or composite D-handles give operators precise control over the blade face angle, preventing wrist twisting when encountering hidden stones. The Spade Garden Shovel,Steel Square Flat Spade features a crescent or flat manganese steel head with integrated foot steps, allowing the user to transfer direct body weight into compacted soil. Reinforced forged collars and rigid teardrop shafts absorb heavy prying forces when separating stubborn sod blocks from native subsoil.
Soil Moisture Conditions and Layout Line Preparation
Soil moisture plays a crucial role in the structural integrity of a freshly cut trench wall. Parched, bone-dry soil crumbles upon blade penetration, causing the vertical turf wall to collapse before the trench can be fully cleared. Saturated, muddy ground clings to the shovel face, smearing the trench profile and compacting delicate root zones under foot traffic. The ideal edging window occurs approximately twenty-four to forty-eight hours after deep rainfall or thorough irrigation, when subsoil reaches friable field capacity and yields cleanly to blade pressure.
Establishing straight sightlines or smooth sweeping arcs prevents wavy, uneven border boundaries. For straight borders along driveways or fence lines, stretching high-visibility mason twine tightly between two wooden stakes creates an exact physical guide. Curved landscaping beds require flexible rubber garden hoses or specialized marking paint to outline smooth, organic transitions. Stepping back several yards to view the proposed curvature from multiple angles ensures symmetrical bed proportions before breaking any ground.
Executing the Primary Vertical Cut Along the Turf Perimeter
The first physical phase of the edging process establishes the ninety-degree vertical retaining wall against the lawn side. Stand directly on the turf surface facing inward toward the lawn, positioning the spade blade on the waste side of the layout guide string. Drive the blade straight down into the soil to a uniform depth of three to four inches, utilizing the midfoot over the step plate rather than toe pressure. Driving the blade straight down cleanly severs the horizontal stolons of spreading grass types like Bermuda and Kentucky bluegrass without bruising surrounding crowns.
Rocking the shovel handle slightly backward into the bed breaks the root connection at the base of the cut before lifting the tool. Avoid prying aggressively toward the turf side, as outward pressure will fracture the root mass and cause the grass crest to slough off. Lift the blade cleanly, slide it horizontally along the layout line so that one-third of the blade width overlaps the previous incision, and drive downward again. Overlapping each subsequent stroke guarantees a continuous, smooth cut without uncut vegetative bridges that invite weed passage.
Excavating the Angled Bed Cut to Create the English Trench
Carving the angled bed side completes the signature V-shaped trench of the traditional English landscape border. Move your stance into the garden bed, facing toward the freshly sliced vertical turf wall. Position the cutting edge of the spade approximately four to six inches into the bed away from the vertical cut, angling the blade back toward the base of the initial incision at a forty-five-degree pitch. Drive the shovel down until the blade tip intersects the bottom of the vertical cut, releasing a triangular wedge of sod and soil.
Pry the loosened sod wedge upward, lifting the root mass out of the trench and depositing it into a utility cart or wheelbarrow for composting. Small hand tools, including the Hand Dibber with 5 inches Measuring Scale, can assist in measuring trench depth consistency or prying out small, stubborn clumps in tight corners. Once the large triangular chunks are evacuated, invert the shovel and drag the blade heel along the bottom channel to create a flat, debris-free gutter. This excavated trench provides an air gap that naturally root-prunes horizontal grass runners trying to cross into planting soil.
Managing Dense Roots, Compacted Clay, and Stony Soil
Encountering dense lateral tree roots or stubborn surface runners often stalls standard shovel penetration. Forcing a standard flat blade against mature hardwood roots dulls the cutting edge and risks bending the tool shank. Serrated spade profiles, such as the edge found on the Spade Garden Shovel,Steel Square Flat Spade, saw through fibrous root networks when pressed with steady downward foot pressure. For substantial roots exceeding one inch in diameter, bypass pruners or specialized loppers should be used to make clean, surgical cuts rather than hacking with the shovel blade.
Heavy clay subsoils present unique challenges due to high cohesion and resistance to shearing forces. Applying a light coating of biodegradable lubricant or vegetable oil to the steel blade face prevents sticky clay plates from adhering to the shovel surface. In rocky ground, avoid driving full body weight onto the step plate if the blade strikes immovable stone, which can chip heat-treated steel edges. Shift the blade an inch to either side to clear the stone, pry it loose with a hand trowel, and resume the clean trenching profile.
Aligning Mower Wheel Tracks with Excavated Edge Trenches
Operating mowers along freshly cut manual borders requires careful wheel positioning to prevent turf scalping and edge collapse. Heavy commercial zero-turn mowers and heavy-duty lawn mowers carry substantial rear axle weight that can crush soft, unreinforced trench walls if drive tires ride too close to the boundary. Keep the mower drive wheels at least two to four inches inward from the vertical turf lip, allowing the floating mower deck to overhang the trench naturally. Setting the cutting deck anti-scalp rollers properly prevents the blade chamber from gouging the bare soil shoulder.
Lighter walk-behind machines, such as self-propelled electric mowers, provide superior edge tracking along delicate bed contours. Their lightweight deck construction minimizes lateral ground compaction, helping the vertical soil wall retain its structural integrity through wet spring mowing cycles. Adjusting cutting height to maintain a consistent three-inch to four-inch turf canopy preserves leaf blade density, which shades the vertical edge wall and inhibits opportunistic weed germination along the exposed soil face. Operators should alternate mowing directions each week to prevent wheel ruts from forming parallel to the border trench.
Mulch Retention and Depth Calibration in the Edging Trench
Proper mulch placement inside the newly excavated trench stabilizes the soil bed without bridging the grass barrier. Filling the entire trench with thick wood chips defeats the purpose of the English edge, giving creeping grass runners a rich, moist medium to climb across. Keep the lowest two inches of the trench completely clear of mulch, creating a true open gutter at the base of the ninety-degree turf cut. Slope the organic mulch upward from the floor of the trench back into the interior of the planting bed at a gentle incline.
This recessed mulch installation retains landscape moisture while keeping wood fragments away from mower cutting blades. High-lift blades operating on adjacent grass generate powerful downward vacuum currents that pull loose mulch from shallow beds into mower chambers, dulling cutting edges prematurely. A deep, cleanly defined shovel trench captures stray particles, keeping hardscapes and turf pristine during high-speed mowing passes. Periodic inspection after severe rainstorms ensures that accumulated silt has not washed into the channel, preserving the vital air gap between lawn and landscape.
Tool Sharpening, Blade Maintenance, and Ergonomic Care
Maintaining a razor-sharp cutting edge on the edging shovel dramatically reduces physical effort and hand fatigue. Regular contact with abrasive sandy soil, small gravel, and tree roots rounds off factory bevels over several edging sessions. Secure the shovel head in a workshop bench vise and run a flat mill bastard file along the working edge at a single thirty-degree to forty-five-degree bevel. File exclusively on the inside face of the blade, pushing the file forward in smooth, single-direction strokes to remove burrs and restore crisp slicing geometry.
Post-work maintenance preserves steel tool heads against rust and environmental pitting in humid sheds. Wash residual soil, sap, and vegetative matter from the shovel with a stiff nylon brush, and dry the metal surface thoroughly with a cloth. Applying a light film of mineral oil or protective paste wax prevents moisture from penetrating the blade surface between seasonal border touch-ups. Inspect wooden and composite handles periodically for hairline fractures or loose ferrule collars, ensuring the tool remains safe and structurally dependable under heavy leverage.
Seasonal Touch-Ups and Annual Edge Restoration
Maintaining crisp border lines throughout the growing season requires minimal effort once the primary trench is excavated. In midsummer, active stolons and aggressive weed sprouts occasionally jump the air gap, establishing small bridgeheads along the trench wall. A rapid touch-up pass with a sharp spade cuts these rogue runners in minutes without requiring complete re-trenching of the bed perimeter. Simply slice along the original vertical line, flicking minor root intrusions into the bed for quick raking and removal.
Annual restoration in early spring resets the trench depth following winter frost heave and freeze-thaw soil shifts. Frost cycles naturally soften steep vertical cuts, causing loose topsoil to slough down into the gutter and elevate the trench floor. Re-establishing the clean ninety-degree drop before the first seasonal turf growth surge ensures hassle-free mowing and distinct border separation all year. Regular maintenance reinforces the structural soil boundary, preserving property curb appeal and preventing messy turf creep with straightforward manual tools.
Mastering manual shovel edging provides long-term aesthetic and agronomic benefits that powered string trimmers cannot replicate. By carving a true recessed trench, property owners protect plant beds from invasive grass runners while safeguarding mower blades from hidden bed debris. Consistent depth control, clean vertical slicing, and proper trench angle excavation transform standard yard borders into immaculate landscape features. Verifying alignment, maintaining sharp shovel edges, and exercising disciplined wheel control during weekly cuts will keep property borders crisp and resilient across every season.







Write Your Review
No reviews yet. Be the first to share your experience!