


A riding mower that clicks instead of starting may have a discharged or failing battery, but adding water is only relevant if the battery is a serviceable flooded lead-acid type. The question of how to add water to a lawn mower battery has a simple central answer: check the manufacturer’s instructions, open only removable cell caps, and use distilled water. Sealed AGM batteries and cordless mower packs aren’t refillable, and opening them can cause damage or expose you to hazards.
Before touching a lead-acid battery, turn the mower off, remove the key, and work in a well-ventilated area away from flames and sparks. Wear eye protection and acid-resistant work gloves, and don’t handle a battery with a cracked case, leaks, or visible swelling. Our guide to mower battery fit and compatibility explains why battery type and physical design matter when replacing a unit.
Watering equipment can make maintenance easier, but it doesn’t make every battery serviceable. The products below include a manual filler and watering-system components, as well as an hour meter that can help track engine use. Check the battery label and mower manual before buying a watering accessory, since the listed watering system is designed for a specific arrangement of flooded batteries.

Pros
- Auto shut-off feature ensures accurate filling without guesswork or mess
- Sturdy plastic build feels durable and resistant to battery acid
- Large 2-quart capacity handles multiple batteries before needing a refill
- Easy to use design simplifies a routine maintenance task
Cons
- Only compatible with traditional flooded lead-acid batteries, not AGM or gel types
- May be overkill for homeowners with just one small battery to maintain
- Some users might prefer a smaller bottle for tight battery compartments
Maintaining the batteries in your lawn tractor, riding mower, or other outdoor power equipment is a simple but important chore. The Mighty Max Battery Golf Cart/Deep Cycle Battery Water Filler Bottle with Auto Shut Off aims to make that job cleaner and more precise. This 2-quart bottle is designed specifically for flooded lead-acid batteries, the type commonly found in lawn and garden equipment.
The standout feature here is the auto shut-off valve. As you fill each battery cell, the bottle stops dispensing automatically once the electrolyte reaches the proper level. This eliminates the guesswork and the risk of overfilling, which can lead to acid spills and corrosion. The double action fast flow valve tip also prevents after-drip, so you won't have acid dribbling down the side of the battery after you move to the next cell.
Build quality is solid for a maintenance tool. The bottle is made from tough, translucent polyethylene that can withstand occasional drops and is resistant to battery acid. The blue color allows you to see the fluid level inside, and the 2-quart capacity is generous enough to top off several batteries in one go—handy if you maintain multiple machines.
Using the bottle is straightforward: simply remove the vent caps from your battery, insert the nozzle into each cell, and squeeze the bottle. The auto shut-off does the rest. The design helps keep the battery top dry, which is important because a wet battery surface can cause a slow discharge over time. Keeping the terminals and top clean extends battery life.
One limitation to keep in mind is that this filler is only for conventional flooded batteries. If your equipment uses AGM, gel, or maintenance-free sealed batteries, this tool won't work. Also, while the 2-quart size is convenient for multiple batteries, some users might find it a bit bulky for tight battery compartments in smaller tractors.
Overall, this is a well-designed, practical tool for anyone who maintains their own lawn and garden equipment. It takes the mess and uncertainty out of battery watering, and it's built to last. If you have a riding mower, zero-turn, or tractor with standard flooded batteries, this filler is a worthwhile addition to your maintenance kit.
Pros
- Helps you stay on top of engine maintenance by tracking total run time
- Provides real-time RPM readings for tuning small engines
- Waterproof design (IP65) holds up to outdoor conditions
- Replaceable battery ensures long-term use without hardwiring
Cons
- Setup requires basic wiring knowledge; not entirely plug-and-play for all users
- Display is small and may be hard to read in direct sunlight
- Some users may prefer a backlit display for low-light conditions
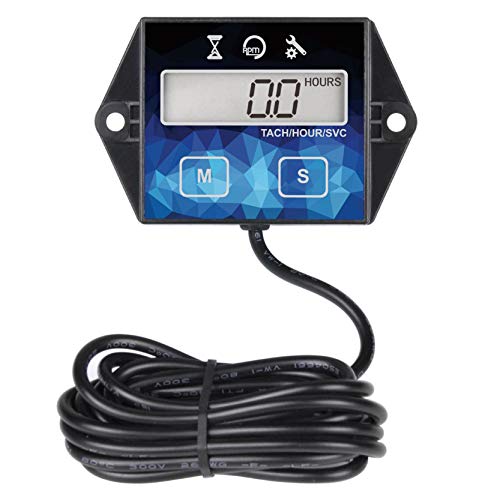
The Runleader RL-HM011F Digital Hour Meter Tachometer is a practical add-on for anyone who owns small-engine equipment like lawn mowers, generators, pressure washers, or tractors. This compact device combines an hour meter and tachometer into one unit, helping you track engine runtime and RPM without needing separate tools. It's especially useful for homeowners who want to simplify maintenance scheduling and ensure their equipment runs smoothly season after season.
In real-world use, the hour meter function is straightforward. It records total engine hours with 0.1-hour accuracy, so you can easily follow manufacturer maintenance intervals for oil changes, air filter cleaning, or spark plug replacement. The tachometer measures RPM while the engine is running, which can help you adjust idle speed for smoother operation or troubleshoot performance issues. The device can be programmed for different engine firing patterns (1-2-4-6-8), making it compatible with most gasoline engines.
Build quality is solid for the price. The unit is rated IP65 for water resistance, meaning it can handle rain, splashes, and general outdoor exposure without failing. The housing feels durable, and the included CR2450 battery is replaceable, so you won't need to hardwire the unit for power. Data is retained even after battery changes or shutdowns, which is a thoughtful touch for long-term use.
Installation is relatively simple if you're comfortable with basic wiring. The device connects to the ignition coil or spark plug wire using the included leads. Clear instructions guide you through the process, but those unfamiliar with small engine electronics might need a bit of patience. Once installed, the display shows total hours when the engine is off and switches to RPM when running. The buttons allow you to reset total hours or set maintenance reminders, though the interface takes a moment to learn.
One limitation is the display size. At about 1.5 inches wide, the numbers are readable but not large. In bright sunlight, glare can make it harder to see. A backlit display would be a welcome improvement for low-light conditions. Also, while the waterproof rating is good, the unit isn't designed for submersion, so avoid pressure washing directly at it.
Overall, the Runleader RL-HM011F is a budget-friendly tool that delivers on its promise. It's best for equipment owners who want to stay proactive about maintenance without spending a lot. If you have a lawn mower, generator, or tractor and want to track hours and RPM easily, this meter is a worthwhile investment. Just be prepared for a small learning curve during installation.
Pros
- Eliminates the need to open each vent cap individually, speeding up battery maintenance
- Indicator eye on each valve confirms proper operation and when cell is full
- Manual pump requires no electricity, so it works anywhere, anytime
- Compatible with many 6V flooded lead-acid batteries (check compatibility list)
Cons
- Manual pump requires some physical effort to squeeze; not as effortless as automatic systems
- Only designed for 6-battery setups of 6V flooded lead-acid batteries; not for 12V or AGM batteries
- Price point around $166 may feel high for a manual watering system, though it saves time over time
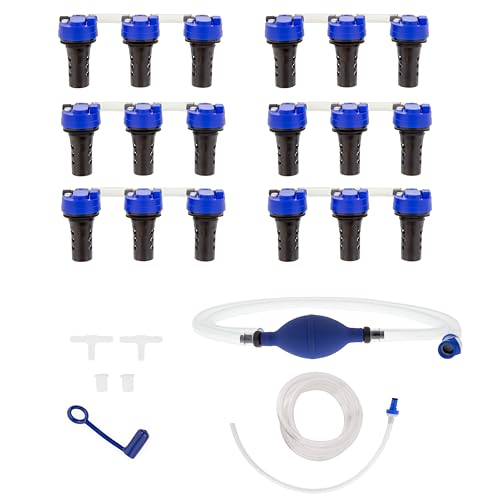
If you own a golf cart or RV with a bank of 6V flooded lead-acid batteries, you know the chore of checking and filling each cell manually. The Water My Battery 6-battery kit simplifies this task with a single-point watering system that includes a manual hand pump. Instead of unscrewing six vent caps per battery, you install a series of valves and clear tubing that connect all cells to one fill port. A few squeezes of the bulb pump deliver water directly to each cell, and the automatic shut-off valves stop flow when the electrolyte reaches the correct level—no guesswork, no spills.
This system is designed for homeowners who use golf carts for neighborhood cruising, light yard work, or property maintenance. It also suits RV owners who need to keep their house batteries topped off. The manual pump means you don’t need a faucet or power source, so you can water batteries in the garage or even on the trail. The clear tubing lets you see water moving, and the indicator eyes on each valve confirm that the cell is full. However, the manufacturer advises not to rely solely on the indicator; water based on usage patterns.
Build quality is solid—the valves are made in the USA with reinforced encapsulation to protect the float and keep internal components above the electrolyte. A built-in spark arrestor adds safety by preventing sparks or flames from entering the battery vent. The tubing is transparent and flexible, making installation straightforward. Most users report that the kit fits their specific battery model (check the compatibility image on the product page).
Setting up the system takes about 15-30 minutes: remove existing vent caps, snap in the valve assemblies, connect the tubing, and attach the pump. The manual pump is simple to use—just squeeze the bulb to push water through the system. No electricity or batteries required. Maintenance is minimal; just ensure the pump is stored clean and the tubing doesn’t kink. Some users find that the pump requires a firm squeeze, especially if the batteries are located far from the water source.
Realistically, this system is a convenience upgrade, not a necessity. It works best for setups with multiple 6V batteries, like a typical 48V golf cart (six 8V batteries) or a 36V system (six 6V batteries). It is not compatible with 12V batteries, AGM, or gel cells. The price of $165.99 may seem steep for a manual system, but it can save hours of maintenance over the life of the batteries and reduce the risk of under- or over-filling, which can damage batteries.
For homeowners who want to simplify battery care and extend the life of expensive golf cart or RV batteries, the Water My Battery kit is a practical investment. It’s especially useful for those who are not mechanically inclined but still want to maintain their equipment properly. If you have a compatible battery bank and value easy, accurate watering, this kit is worth considering.
The manual pump is straightforward: connect it to the fill port, squeeze the bulb, and watch water flow through the clear tubing. The automatic shut-off valves stop filling each cell at the correct level, so you don’t have to monitor every cell. The indicator eyes provide a quick visual check. Initial installation requires removing old vent caps and snapping in the new valves—no tools needed. The system is designed for occasional use; most users find it takes about 5 minutes to water a full battery bank.
Pros
- Steady, reliable water flow without pumps or electricity
- Large 2.5-gallon tank means less frequent refilling
- Easy to set up and use for most battery watering systems
- Built to last with sturdy materials
Cons
- Only works with compatible battery watering systems—may need adapter for other brands
- Gravity-fed design requires tank to be placed above battery level
- Not suitable for sealed or maintenance-free batteries
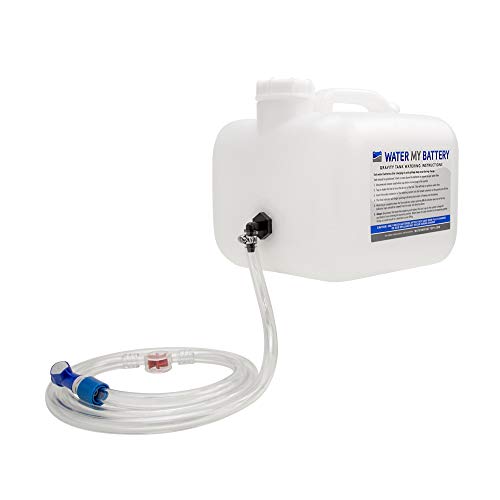
The Water My Battery Gravity Tank (2.5 gal) is a handy accessory for anyone who needs to maintain flooded lead-acid batteries in outdoor power equipment like golf carts, lawn mowers, or utility vehicles. It's designed to simplify the watering process by using gravity to deliver a steady flow of water directly to each battery cell, eliminating the need for manual filling or electric pumps.
For homeowners with a golf cart or a riding mower that uses traditional lead-acid batteries, this tank can save time and reduce the risk of over- or under-watering. The 2.5-gallon capacity is enough to service multiple batteries in one go, which is especially useful for those with larger equipment or small fleets.
Build quality appears solid, with a durable plastic tank that should hold up to regular use. The blue connector is designed to work with Water My Battery and Battery Watering Technologies systems, though users with other brands may need to purchase a separate adapter. Setup is straightforward—just mount the tank above battery level, connect the hose, and let gravity do the work.
One practical limitation is that it only works with compatible watering systems, so it's not a universal solution. Also, it's not designed for sealed or maintenance-free batteries. But for those with the right setup, this gravity tank offers a convenient, low-maintenance way to keep batteries topped off.
Overall, if you already have a compatible battery watering system or are looking to upgrade from manual watering, this tank is a solid choice. It's practical, easy to use, and built to last—ideal for the budget-conscious homeowner or small-scale operator who wants to extend battery life with minimal effort.
Adding Water Without Overfilling a Mower Battery
Watering a battery is a maintenance task for certain flooded lead-acid batteries, not a repair for a weak or dead battery. The liquid inside is electrolyte, a mixture involving sulfuric acid and water; normal charging and use can reduce the water level in a serviceable battery. Add only distilled water, and follow the battery maker’s fill-level instructions. If the battery is sealed or its instructions prohibit opening it, don’t try to add water.
Confirm the Battery Has Removable Cell Caps
Start by identifying the battery chemistry and construction from its label and the mower’s owner’s manual. A flooded battery may have removable vent caps that provide access to its cells; a sealed AGM battery is not meant to be opened or topped up. A 12-volt LiFePO4 starter battery and a proprietary cordless lithium-ion mower pack also have no water-filling step. Don’t assume that a plastic cover or molded line on the case means there are serviceable cells underneath.
Battery cases can look similar even when their service requirements differ. A removable cap is not permission to pry open a sealed unit, and a battery described as maintenance-free should be treated according to its manufacturer’s instructions. If the label is missing, the cap design is unclear, or the manual can’t be found, pause and identify the exact battery before proceeding. A mower dealer or battery retailer may be able to help identify it from the model and label information.
Inspect the case before removing any cap. Do not service a battery that is cracked, leaking, bulging, unusually hot, or emitting a strong odor. Keep flames, cigarettes, and spark-producing tools away from the battery because charging lead-acid batteries can release flammable gas. If electrolyte has spilled, avoid skin and eye contact and follow the manufacturer’s spill guidance rather than attempting routine watering.
Prepare a Clean, Safe Work Area
Park on a stable, level surface, set the parking brake, switch off the ignition, and remove the key. Let a recently used battery cool before opening its caps, and provide ventilation. Wear eye protection and acid-resistant gloves, and keep children and pets away. Use a clean container and clean tools so dirt or metal fragments don’t enter the cells.
If the battery must be removed to reach the caps, follow the mower manual’s removal procedure. For a negative-ground 12-volt mower battery, disconnect the negative cable first and keep it clear of the terminal; disconnect the positive cable afterward if required. When reinstalling, connect positive first and negative last, preserving the marked polarity. Don’t let a wrench bridge a terminal and the mower frame, since that can create a short circuit.
Battery tops should be clean and dry before opening the cells. Dirt that falls inside can contaminate electrolyte, while moisture left across the case can contribute to surface discharge. If you find corrosion, follow the battery and mower manufacturers’ cleaning instructions and avoid letting cleaning solution enter the vents or cells. Never use a metal object to probe a cell or clear a vent.
Add Distilled Water Carefully
Read the battery’s own fill instructions first because the correct level can depend on its design. Open only the caps intended for routine service, keeping your face away from the openings. Use distilled water, not tap water, and add it slowly to each cell only to the stated level. Don’t fill to the top of the opening or guess at a level if the battery’s instructions aren’t available.
Electrolyte expansion during charging can push liquid out of an overfilled cell. Spilled electrolyte can corrode nearby metal and create a hazardous cleanup problem, so use a controlled pour or an appropriate battery filler rather than a large open jug. The Golf Cart/Deep Cycle Battery Jug Water Filler is described as having an automatic shutoff valve intended to stop flow at a proper cell level. That feature may help control dispensing, but it doesn’t replace checking that the tool suits the battery opening and following the battery maker’s fill-level guidance.
If the plates are exposed, don’t assume that adding water alone restores the battery. The battery maker’s instructions should determine whether a small amount of distilled water is needed before charging to cover exposed plates, and how to finish the level afterward. Don’t add acid to compensate for ordinary water loss. If electrolyte was spilled, the chemistry is uncertain, or a cell appears damaged, get battery-specific guidance instead of improvising a refill.
Replace the caps securely without overtightening or damaging them, then wipe the outside of the case with an appropriate method specified by the manufacturer. Keep liquid away from terminals and electrical connections. If any electrolyte contacted skin or eyes, use the battery maker’s emergency instructions and seek appropriate medical help; don’t treat exposure as routine cleaning. Store water and tools away from the battery after the job.
Know What a Watering Accessory Can and Cannot Do
The product options in the list serve different roles. The Golf Cart/Deep Cycle Battery Jug Water Filler is a manual filling aid, while the Water My Battery watering kit is described as a system for six 6-volt flooded lead-acid batteries. Its valves and tubing are intended to replace vent caps and allow filling through a single connection, but the supplied description specifies a golf-cart-style multi-battery arrangement, not a universal riding-mower fit. Confirm the battery dimensions, cap design, and manufacturer compatibility information before considering it.
The Water My Battery Gravity Tank is listed for use with a battery watering system, with compatibility information naming Water My Battery and Battery Watering Technologies systems. The description notes that a different connector may be needed with other system manufacturers. It is not a stand-alone way to pour water into an ordinary mower battery, and the supplied details don’t establish compatibility with a particular lawn tractor. Treat system fitment as something to verify, not infer from the product name.
The Runleader RL-HM011F Digital Hour Meter is a separate small-engine accessory rather than a battery watering tool. Its listed functions include an hour meter, tachometer, and service reminders, which may help an owner track engine use and maintenance intervals. It does not monitor electrolyte level or replace battery inspection. Keep the distinction clear when selecting tools for battery service.
Use Voltage Checks to Diagnose Starting Problems
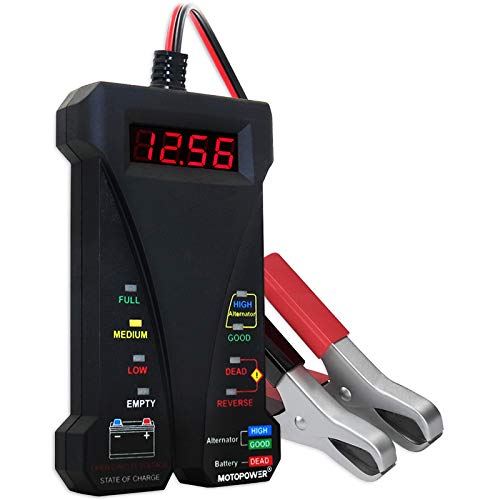
A mower that still cranks poorly after correct watering needs electrical diagnosis, not repeated topping up. A digital multimeter can check a 12-volt lead-acid battery’s resting voltage, but a reading should be taken with the mower off and after the battery has rested. A fully charged battery commonly rests around 12.6 to 12.8 volts, while about 12.2 volts indicates substantial discharge. A reading below 10.5 volts can point to a failed cell, but voltage alone doesn’t prove the cause or show how well the battery performs under starter load.
Set the meter to DC voltage and follow its manual for safe probe placement. Touch the red probe to the positive terminal and the black probe to the negative terminal, taking care not to bridge the posts. Keep hands, leads, and clothing clear of moving parts if testing during cranking, and don’t attempt a load test if the battery is damaged or leaking. A shop or battery retailer can perform an appropriate load test when the result is uncertain.
Rapid solenoid clicking can result from low battery voltage, poor terminal contact, or a weak ground connection; it doesn’t by itself identify a bad battery. Inspect for loose or corroded connections, then check battery condition and charging behavior using the mower and battery manuals. If the engine starts but the battery repeatedly loses charge, a charging-system fault or an electrical draw may be involved. A battery that won’t hold charge after correct charging may need professional testing or replacement rather than more water.
For charging-system checks, follow the mower service information and use a meter only if you can do so safely. The relevant system includes the stator and voltage regulator, and charging output should be assessed at the specified engine speed and test points rather than guessed from an idle reading. If your mower manual calls for checking DC output at operating speed, compare the result with that manual’s range. Avoid probing unfamiliar wiring or bypassing switches, fuses, or safety interlocks.
If jump-starting becomes necessary, follow the mower manufacturer’s procedure and confirm that both systems are 12 volts. The donor vehicle’s engine must remain OFF while connected to a 12-volt riding mower or zero-turn, to help prevent electrical damage to the mower’s stator and voltage regulator. Maintain correct polarity, positive to positive and negative to negative, and keep clamps away from moving parts and battery vents. If the connection points or sequence aren’t clear in the manual, stop and get qualified assistance.
Prevent Water Loss and Avoid Unnecessary Refills
Check a serviceable flooded battery at the intervals its manufacturer recommends, with attention to periods of frequent use and charging. Don’t top it up by calendar habit if the electrolyte is already at the correct level. Excessive water loss can indicate charging or battery problems, while repeated overfilling can cause electrolyte to escape. Record unusual changes and have the charging system checked if the level drops faster than expected.
Off-season storage also affects starting reliability. A discharged lead-acid battery can deteriorate during storage, so follow the battery and mower instructions for disconnecting, charging, and storing it. Use a charger or maintainer specifically suitable for the battery chemistry and voltage; don’t leave an unsuitable charger connected unattended. Check the battery periodically as directed, and keep it clean, dry, and protected from conditions prohibited by its manufacturer.
Watering won’t restore plates damaged by sulfation, repair a shorted cell, or correct a failed stator or regulator. If a battery repeatedly needs water, won’t retain charge, or shows physical damage, stop routine service and identify the underlying problem. For broader advice on choosing a replacement that matches case and terminal requirements, see our riding mower battery selection guide. Match the replacement to the mower manual rather than assuming that similar-looking batteries interchange.
The practical rule is straightforward: add distilled water only to a confirmed serviceable flooded battery, and only to its specified level. Keep sealed batteries closed, use watering accessories only when their fit is verified, and investigate recurring low charge separately. Those checks help prevent a simple maintenance task from turning into a damaged battery or an unsafe electrical problem.





Write Your Review
No reviews yet. Be the first to share your experience!