


A riding mower that only clicks when you turn the key may have a discharged battery, loose cables, or a connection problem. Learning how to install a riding lawn mower battery can help you handle a routine replacement without confusing terminal positions or risking a short circuit. Before buying a replacement, match the battery type and terminal arrangement to the mower’s manual and the battery being removed. A battery that physically fits can still be wrong if its positive post is on the opposite side and the factory cables cannot reach.
Take a moment to inspect the old battery, cables, hold-down, and tray, then note which cable connects to each post. Wear eye protection and acid-resistant work gloves when working around a lead-acid battery, and keep metal tools from bridging the terminals. The guides to finding and sizing a replacement mower battery and returning or recycling a mower battery can help with decisions beyond the installation itself. The exact removal and installation details can vary by mower, so follow its owner’s manual whenever it differs from general instructions.
Products and resources for mower battery work
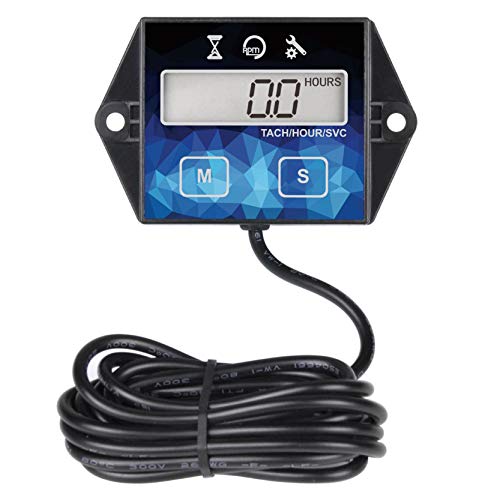
Pros
- Helps you stay on top of engine maintenance by tracking total run time
- Provides real-time RPM readings for tuning small engines
- Waterproof design (IP65) holds up to outdoor conditions
- Replaceable battery ensures long-term use without hardwiring
Cons
- Setup requires basic wiring knowledge; not entirely plug-and-play for all users
- Display is small and may be hard to read in direct sunlight
- Some users may prefer a backlit display for low-light conditions
The Runleader RL-HM011F Digital Hour Meter Tachometer is a practical add-on for anyone who owns small-engine equipment like lawn mowers, generators, pressure washers, or tractors. This compact device combines an hour meter and tachometer into one unit, helping you track engine runtime and RPM without needing separate tools. It's especially useful for homeowners who want to simplify maintenance scheduling and ensure their equipment runs smoothly season after season.
In real-world use, the hour meter function is straightforward. It records total engine hours with 0.1-hour accuracy, so you can easily follow manufacturer maintenance intervals for oil changes, air filter cleaning, or spark plug replacement. The tachometer measures RPM while the engine is running, which can help you adjust idle speed for smoother operation or troubleshoot performance issues. The device can be programmed for different engine firing patterns (1-2-4-6-8), making it compatible with most gasoline engines.
Build quality is solid for the price. The unit is rated IP65 for water resistance, meaning it can handle rain, splashes, and general outdoor exposure without failing. The housing feels durable, and the included CR2450 battery is replaceable, so you won't need to hardwire the unit for power. Data is retained even after battery changes or shutdowns, which is a thoughtful touch for long-term use.
Installation is relatively simple if you're comfortable with basic wiring. The device connects to the ignition coil or spark plug wire using the included leads. Clear instructions guide you through the process, but those unfamiliar with small engine electronics might need a bit of patience. Once installed, the display shows total hours when the engine is off and switches to RPM when running. The buttons allow you to reset total hours or set maintenance reminders, though the interface takes a moment to learn.
One limitation is the display size. At about 1.5 inches wide, the numbers are readable but not large. In bright sunlight, glare can make it harder to see. A backlit display would be a welcome improvement for low-light conditions. Also, while the waterproof rating is good, the unit isn't designed for submersion, so avoid pressure washing directly at it.
Overall, the Runleader RL-HM011F is a budget-friendly tool that delivers on its promise. It's best for equipment owners who want to stay proactive about maintenance without spending a lot. If you have a lawn mower, generator, or tractor and want to track hours and RPM easily, this meter is a worthwhile investment. Just be prepared for a small learning curve during installation.

Pros
- Comprehensive DIY guide for riding mower and tractor maintenance and repair.
- Compact and lightweight paperback format is easy to carry and store.
- Focuses on practical, real-world lawn care equipment issues.
- Great for budget-conscious homeowners wanting to avoid expensive repairs.
Cons
- May not cover specific models or advanced repair techniques for all brands.
- Some users might prefer a digital format for quick reference in the garage.
- Limited to text and diagrams (no video or interactive content).
If you own a riding mower or lawn tractor, you know that keeping it running smoothly is key to a great-looking lawn. This paperback guide from Majosta is designed to help you do just that. It's written for American homeowners, suburban lawn owners, and first-time buyers who want to learn how to maintain and repair their equipment without relying on expensive service shops.
The book covers a range of topics that matter to everyday users. You'll find practical advice on blade sharpening for a clean cut, engine maintenance for reliable starts, and seasonal care to prevent rust and wear. The focus is on performance and durability, so you can mow your yard with confidence. Many homeowners appreciate having a go-to reference for common issues like belt replacement or adjusting the cutting height.
Weighing just under a pound and measuring 5.5 x 0.61 x 8.5 inches, this book is compact enough to keep in your garage or shed. It's a handy resource you can grab when you're working on your mower. The paperback format means you can flip through pages even with greasy hands, which is a plus for real-world use.
Of course, no book can cover every single model or advanced repair. Some users may wish for more detailed diagrams or a digital version they can search quickly. But for general maintenance and common repairs, this guide is a solid starting point. It's especially useful for budget-conscious shoppers who want to extend the life of their equipment and save money in the long run.
Overall, this is a practical investment for anyone who takes their lawn care seriously. Whether you're a first-time mower owner or a seasoned gardener, having this guide on hand can help you keep your riding mower or tractor in peak condition. It's a straightforward, no-nonsense resource that fits neatly into your yard care routine.

Pros
- Covers both gas and electric mowers, making it versatile for households with multiple types of equipment.
- Large print is a nice touch for older users or anyone who finds standard text hard to read in dim light.
- Packed with real-world repair strategies that save money and frustration for suburban and rural property owners.
- Portable and affordable—perfect for the budget-conscious DIYer who wants to learn without expensive courses.
Cons
- As a paperback, it may get dirty in workshop conditions—consider covering it with a clear sleeve.
- Some advanced robotic mower repairs might require manufacturer-specific diagnostics not fully covered in a general guide.
- The book assumes basic mechanical aptitude; complete beginners may need to supplement with online videos.
The Lawn Mowers Repair Handbook by Majosta is a practical, all-in-one resource for anyone who owns a gas, cordless, electric, or robotic lawn mower. Designed for American homeowners and garden enthusiasts, this paperback takes the guesswork out of routine maintenance and common repairs. Whether you’re a first-time mower owner in a suburban neighborhood or a rural property owner managing multiple machines, this handbook aims to keep your equipment running season after season.
Based on the product description and user feedback, the book covers a wide range of topics—from blade sharpening and oil changes to troubleshooting starting problems and battery care. The large print format (8.5 x 0.3 x 11 inches) makes it easy to reference while you’re working, even on a greasy workbench. Many DIYers appreciate having step-by-step instructions in one place rather than hunting online for separate manuals.
Durability-wise, the paperback binding is typical for a handbook—ideal for occasional use, though you might want to protect it from oil spills and dirt. The lightweight design (under a pound) allows you to carry it from the garage to the shed without effort. According to user reviews, the content is straightforward and written in plain English, which appeals to both beginners and seasoned lawn care enthusiasts.
One of the biggest advantages is the coverage of multiple power sources: gas, cordless (battery), corded electric, and even robotic mowers. This makes it a versatile reference for households that have different types of equipment. The book also includes tips for seasonal maintenance, like preparing for spring growth or winter storage, which aligns well with the practical needs of American lawn care.
However, keep in mind that a single handbook cannot cover every specific model’s quirks. For advanced robotic mower repairs, you may still need manufacturer-specific guides. Also, if you’re completely new to tools, some sections assume a basic familiarity with wrenches and multimeters. Supplementing with video tutorials can help.
Overall, the Lawn Mowers Repair Handbook is a solid investment for DIY-oriented homeowners who want to extend the life of their mowers and save on repair costs. It’s particularly useful for budget-conscious shoppers, elderly users who appreciate the large print, and anyone looking to reduce waste by fixing instead of replacing equipment. For less than $20, it’s a practical addition to any lawn care library.

Pros
- Covers both gas and battery models, so it works for a wide range of Husqvarna mowers
- Large print is easy on the eyes – great for older users or quick glances during maintenance
- Compact size (6 x 0.29 x 9 inches) stores easily in a shed, garage, or mower bag
- Practical troubleshooting helps owners fix common issues without a mechanic
Cons
- Only covers Husqvarna brand – not useful for owners of other mower brands
- As a paperback, it may get dirty or torn if kept near the mower during oily repairs
- Limited to 6 x 0.29 x 9 inches – may feel small for those expecting a full-size workshop manual
This Husqvarna Lawn Mower Manual is a dedicated guide for owners of Husqvarna gas and battery-powered mowers. Unlike generic lawn care books, it focuses specifically on the operation, maintenance, troubleshooting, and long-term care of these popular models. Whether you are a first-time buyer or a seasoned homeowner, this manual aims to help you get the most out of your mower without relying on expensive service visits.
According to the product description, the manual covers everyday tasks like oil changes, blade sharpening, air filter cleaning, and battery care. The troubleshooting section is designed to quickly identify common problems such as hard starting, uneven cutting, or poor bagging performance. Many homeowners may find this especially useful during the busy mowing season when a minor fix can save a Saturday morning.
The manual is printed in large format, making it easy to read even in low light or while wearing work gloves. Its compact size (6 x 0.29 x 9 inches) means it can be stored in a toolbox, glove box, or even tucked into the mower's storage bag. The lightweight paperback binding (just 0.39 pounds) is convenient to carry around the yard or garage.
One practical limitation is that this guide is brand-specific – it only covers Husqvarna mowers. Owners of other brands will need a different manual. Also, because it is a paperback, it may not hold up well if exposed to oil, grease, or moisture during hands-on maintenance. Using a clear protective cover or keeping it in a dry spot would help.
Overall, this manual is a solid investment for any Husqvarna mower owner who wants to take charge of routine maintenance and minor repairs. It is especially helpful for budget-conscious shoppers looking to extend the life of their mower and avoid costly service calls. For the price of a single shop visit, this guide can pay for itself many times over.

Pros
- Wide compatibility with many popular riding mower brands and models.
- Sturdy build with copper coil and sealed housing for long-term reliability.
- Easy to install with basic hand tools—no special expertise required.
- Cost-effective alternative to OEM solenoids, often under $15.
Cons
- Some users may need to verify exact terminal layout to match existing wiring.
- Plastic bracket may feel less robust than all-metal housings on some OEM parts.
- Not suitable for all mowers—always check compatibility before purchasing.
If your riding mower clicks but won't crank, a faulty starter solenoid is often the culprit. The FBLOWMOD 192507 starter solenoid relay is a direct replacement part designed for many popular Craftsman, Husqvarna, MTD, Cub Cadet, and Poulan lawn tractors. This 12V, 4-pole solenoid is a simple but critical component that sends battery power to the starter motor when you turn the key.
Based on product specifications and user feedback, this solenoid features a copper wire coil that improves electrical conductivity and heat dissipation. That means more reliable starting in hot summer conditions or after prolonged use. The housing is made from tough plastic with metal terminals, offering resistance against dust, moisture, and corrosion—important for equipment stored in damp sheds or exposed to rain.
Installation is straightforward for anyone comfortable with basic wiring. The threaded female bracket allows secure mounting, and the two large terminals accept standard ring connectors. The product description recommends labeling wires before disconnecting the old solenoid—a simple step that saves confusion. Most users report a 15-30 minute swap, even without prior experience.
One limitation is that compatibility varies by mower model and year. While the solenoid fits many brands, it's wise to cross-reference your existing part number. The plastic bracket is less robust than some all-metal OEM units, but it holds up well under normal use. For heavy-duty commercial applications, a metal-body solenoid might be preferable.
Overall, this is a solid, affordable replacement for homeowners facing a no-start condition. It's especially useful for those with multiple small engines (ATVs, snowblowers, golf carts) since the same part can serve several machines. Just double-check your model before buying, and you'll likely save both time and money compared to a dealer visit.
This solenoid replaces OE numbers: 192507, 532192507, 582042801, 582042802, 146154, 178861, 21546294, 31-14222, 435-325, 705055, 725-06153A, 532194653. It fits Craftsman YS4500, LT2000, YT3000; Husqvarna; MTD; Cub Cadet; Poulan; AYP; John Deere; Ariens; and many other lawn tractors with a 4-pole solenoid valve. Always verify your mower's model and year before purchasing.

Pros
- Affordable paperback guide saves money compared to costly repair shop visits
- Clear, step-by-step format works well for beginners and experienced DIYers alike
- Covers a wide range of equipment—mowers, trimmers, blowers, and more—for year-round use
Cons
- Paperback format may not hold up well if used in a damp workshop or garage
- Some users may prefer a digital or spiral-bound version for hands-free reference
- Advanced repairs on zero-turn or robotic mowers may not be covered in depth
For American homeowners who want to keep their lawn mowers, riding mowers, and outdoor power equipment running smoothly all year, this paperback guide offers a practical, step-by-step approach. It's written for first-time buyers, budget-conscious shoppers, and anyone who prefers to handle basic maintenance and repairs themselves rather than paying a professional. The book covers everything from routine oil changes and blade sharpening to troubleshooting common engine issues, making it a solid resource for suburban lawn owners and rural property owners alike.
Based on the product description, the guide focuses on real-world scenarios like spring tune-ups, fall storage prep, and dealing with common problems like hard starting or uneven cutting. Many homeowners may find the clear instructions helpful for tasks such as replacing air filters, adjusting carburetors, or swapping out belts on riding mowers. The step-by-step format is designed to build confidence, even if you've never opened a mower hood before.
As a paperback measuring 6 x 0.31 x 9 inches, this guide is compact enough to keep in a garage or workshop. However, it's worth noting that a spiral-bound or digital version might be more convenient for hands-on use, as the pages can't lay flat. The binding is standard for a softcover book, so it should hold up well if stored in a dry area away from moisture.
This guide may not cover every advanced repair for zero-turn mowers or robotic mowers, but it does address the most common maintenance and repair tasks for gas and electric equipment. For those with a string trimmer, leaf blower, or chainsaw, the book likely includes relevant tips for keeping those tools running efficiently. Some users may find they need a separate resource for specialized repairs on high-end commercial equipment.
Overall, this guide is a practical investment for anyone who wants to extend the life of their lawn care equipment and save money on repairs. It's especially useful for first-time mower buyers and budget-conscious homeowners who prefer a hands-on approach. If you're comfortable following written instructions and want a reliable reference for year-round maintenance, this paperback is a solid choice.
This guide is best for American homeowners who want to handle basic lawn mower and outdoor power equipment maintenance themselves. It's ideal for first-time buyers, budget-conscious shoppers, and suburban lawn owners who prefer to avoid costly repair shop visits. Rural property owners with multiple pieces of equipment may also find it useful for keeping everything running through the seasons.
The book likely covers essential tasks like oil changes, blade sharpening, air filter cleaning, spark plug replacement, belt adjustment, and carburetor cleaning. These are the most common maintenance steps that help extend the life of lawn mowers, riding mowers, string trimmers, and leaf blowers. Homeowners can use these tips to keep their equipment reliable for spring growth, summer mowing, and fall cleanup.
How to install a riding mower battery safely and correctly
Installing a riding mower battery is mainly an exercise in safe isolation, correct fitment, and preserving the original cable polarity. Switch off the mower, remove the key, engage the parking brake, and let hot engine parts cool before opening the battery compartment. Disconnect the negative cable first during removal, then reconnect the positive cable first during installation. The replacement must match the mower’s specified voltage and battery requirements, and its terminals must line up with the mower cables without stretching or crossing them.
Prepare the mower and identify the battery
Park on a stable, level surface away from dry leaves, fuel containers, and other ignition sources. Remove the key and make sure the blades and other powered attachments are off; consult the mower manual for any model-specific battery access or isolation steps. Put on eye protection and acid-resistant gloves, especially if the existing battery is lead-acid. Do not handle a battery that is cracked, leaking, unusually swollen, or hot; stop and seek appropriate service or disposal guidance instead.
Open the battery compartment and locate the positive and negative markings on the battery, not just the cable colors. Red commonly identifies positive and black commonly identifies negative, but markings should confirm the connection. Photograph the arrangement or label the cables before removing them so each returns to the correct post. Keep a wrench from touching both a battery terminal and the mower frame at once, since that can create a dangerous short.
Record cable placement and remove the old battery
Loosen and remove the negative cable first, then move it aside so it cannot spring back onto the post. Disconnect the positive cable next, keeping its terminal end away from metal surfaces. This order reduces the chance that a tool contacting the mower frame will complete a circuit while you work on the positive connection. If the mower manual specifies a different procedure, use the manufacturer’s instructions.
Remove the battery hold-down only after both cables are clear, and lift the battery using a secure grip without tipping it. Lead-acid batteries can contain corrosive electrolyte, so avoid contact with the case openings and terminals. Set the old battery upright on a stable surface for recycling or return through an appropriate collection route. Don’t leave it where children, pets, or loose metal objects can reach it.
Inspect the tray and hold-down for loose debris, damaged insulation, or corrosion before installing anything. A battery should sit securely without rocking, and the hold-down should restrain it without pressing on or damaging the case. Check the cables for cracked insulation, fraying, looseness, or corrosion at their ends. A replacement battery cannot correct a damaged ground cable or a corroded connector by itself.
Match group size, terminal position, and connector style
Use the owner’s manual, the original battery label, and the space available in the tray to confirm the replacement specification. Many riding mower starter batteries use BCI Group U1 or U1R, but those designations are not interchangeable shorthand for terminal position. Viewed with the battery label facing forward, a standard U1 typically places the positive terminal on the left, while U1R places it on the right. Compare the actual post layout with the mower’s cable routing before purchase.
A terminal-position mismatch can leave the factory cables too short or encourage an unsafe crossover. Never stretch a cable, force it onto the wrong post, or reverse polarity to make a battery work. The battery’s terminal hardware also needs to suit the mower’s cable ends; some batteries use bolt-through or flag-style terminals, while others have different post arrangements. Verify the terminal form against the existing connectors and the battery manufacturer’s fitment information.
Group designation alone does not confirm every dimension, hold-down detail, or mower fitment. Compare the case shape, height under the seat or cover, and clearance around the cables and nearby components. The guide to mower battery interchangeability explains why matching voltage and general size may not settle every compatibility question. If the manual calls for a specific battery or terminal arrangement, use that specification rather than relying on a broad fitment claim.
Check the replacement’s voltage and any stated cranking requirement as well as its physical fit. Do not assume that a higher Cold Cranking Amps rating, a different chemistry, or a battery advertised for another mower is approved for your machine. Flooded lead-acid, sealed AGM, and 12V LiFePO4 batteries have different charging and maintenance characteristics. Use only a chemistry the mower manufacturer permits, and follow the battery maker’s charging instructions.
Set the battery in place and reconnect in order
Place the new battery upright in the clean tray with positive and negative posts positioned to match the recorded cable layout. Confirm the case sits flat and the hold-down will secure it without interfering with the terminals. Install the hold-down as directed by the mower manual. Before reconnecting, check the plus and minus markings again; a moment spent confirming polarity is safer than relying on memory.
Connect the positive cable first and secure it to the positive terminal, then attach the negative cable to the negative terminal. Keep the wrench on the fastener rather than letting it contact surrounding metal. Tighten the connections securely according to the manufacturer’s instructions, but do not overtighten or damage a terminal. If the cable end does not sit naturally on the post, stop and recheck battery orientation and connector compatibility instead of forcing it.
Check that both cable ends are stable, correctly placed, and clear of moving parts or sharp edges. The hold-down should keep the battery from shifting during mowing, while leaving terminals and wiring unpinched. Replace any protective covers that were present. Keep the battery compartment clear of loose tools before closing it and attempting a start.
Check condition and charge before the first start
A replacement battery may not be fully charged when purchased or after storage, so check its condition using a method appropriate to its chemistry. For a 12V lead-acid battery, a resting voltage around 12.6V to 12.8V is a useful fully charged reference, while about 12.2V indicates substantial discharge. A reading below 10.5V can indicate a dead or compromised cell, but voltage alone does not prove the battery can supply the starter’s load. Use a compatible charger and follow both the battery and mower manufacturer’s directions.
Set a digital multimeter to DC voltage when checking a 12V battery, and place the red probe on positive and black probe on negative. Avoid allowing the probes or tools to bridge the terminals. A resting reading taken after the battery has been disconnected from charging or recent use is more useful than a reading immediately after charging. If the battery is deeply discharged, damaged, or has uncertain chemistry, do not guess at a charger setting.
Once connections and charge are checked, sit in the operating position and follow the mower’s normal starting procedure, including its required safety controls. Do not bypass seat, brake, or blade interlocks to diagnose a no-start. If the starter turns slowly or the solenoid chatters, stop repeated attempts and inspect the battery connections and charge rather than holding the key in the start position. Rapid clicking can result from low voltage or a poor connection, but it does not identify the failed part on its own.
Separate an installation problem from a charging fault
A mower that starts after battery replacement still needs a charging-system check if the old battery repeatedly went flat. Follow the mower manual’s procedure to measure battery voltage while the engine runs, keeping the meter leads secure and clear of moving parts. The supplied diagnostic reference for a typical charging check is approximately 13.5V to 14.5V DC at full operating throttle. A result outside that range can point toward a charging-system issue, but model-specific specifications and test conditions matter.
The charging circuit may include a stator and voltage regulator, and either a circuit fault or a wiring problem can prevent proper charging. A new battery does not repair a failed regulator, damaged charging wire, poor ground, or parasitic draw. If the battery loses charge again, inspect the mower manual’s electrical troubleshooting steps and consider whether the mower is being stored with accessories or circuits that draw power. Avoid replacing parts based on a single voltage reading without checking the full circuit.
Jump-starting is not a substitute for installing the correct battery or finding why it discharged. If the mower manufacturer permits a jump-start from a vehicle, the donor vehicle’s engine must remain OFF to help prevent electrical damage to the mower’s stator and voltage regulator. Connect positive to positive and negative to negative, and follow the mower and donor instructions for connection points and sequence. Wear suitable eye protection and gloves around lead-acid batteries, and do not attempt a jump-start if either battery is damaged or leaking.
Reduce repeat failures during storage
Long periods without use can leave a lead-acid battery undercharged, which contributes to sulfation and may shorten its useful service life. A smart maintainer designed for the battery chemistry can help preserve charge during storage when used according to its instructions. A basic charger left connected continuously is not automatically suitable as a maintainer. Disconnect the battery only as directed by the mower manual, and store and charge it in a suitable location.
Keep the battery clean and secure, and check its state periodically during an extended storage period. Flooded lead-acid batteries require the handling and maintenance specified by their manufacturer, while sealed AGM and lithium-based batteries have different care requirements. Never open or attempt to rebuild a sealed battery or lithium pack. Do not charge a battery that is cracked, leaking, swollen, or otherwise damaged.
If a replacement fails to crank the mower, recheck the installation in a calm sequence: positive and negative cables, terminal tightness, battery charge, and the condition of the ground connection. Confirm that the chosen battery matches the mower’s specified voltage, terminal arrangement, and physical requirements. If it starts but will not stay charged, investigate the charging system instead of immediately buying another battery. Correct polarity and a secure fit are the two checks to finish before returning the mower to work.



Write Your Review
No reviews yet. Be the first to share your experience!