


Pulling the starter cord on a stubborn small engine can quickly turn routine Saturday yard work into an exhausting chore. Whether you are dealing with a classic push mower or a self-propelled residential machine, mastering how to start a briggs and stratton lawn mower requires understanding how fuel, airflow, and ignition spark interact inside the combustion chamber. Modern four-stroke small engines rely on strict safety interlocks and balanced fuel delivery systems that demand a specific sequence before the flywheel can turn over smoothly. Knowing how your specific engine controls operate prevents common frustrations like flooded cylinders, snapped pull cords, and wasted physical effort.
While many suburban homeowners are exploring cordless battery lawn mowers for push-button convenience, millions of dependable gas machines powered by Briggs & Stratton engines remain the backbone of residential lawn care. These engines range from compact 140cc E-series units on lightweight decks to larger overhead-valve configurations equipped with automatic chokes or primer bulbs. When mechanical components wear down or fuel sits idle for too long, simple ignition sequences fail to fire. Learning the exact cold-start protocols and basic mechanical diagnostic checks will keep your equipment firing on the first or second pull all season long.

Pros
- Direct fit for common Briggs & Stratton engines used on many Troy-Bilt and Craftsman mowers
- Solves the most common pull-start failures quickly and affordably
- Sturdy build quality for the price point
Cons
- Fitment verification required—engine model must match to avoid wrong purchase
- May require basic mechanical skills for installation
The PSLER 593959 591139 Recoil Starter is a practical replacement part designed for homeowners who rely on Briggs & Stratton-powered lawn mowers, particularly the 550EX, 500E, and 450E series. If you own a Troy-Bilt TB110, TB200, Craftsman M110, or similar mower, this pull start assembly targets a common frustration: a rope that jams, snaps, or refuses to retract. It offers a straightforward, budget-friendly solution to get your mower starting reliably again.
Based on product specifications, this recoil starter is engineered as a direct replacement for OEM numbers 593959, 591139, 590588, 593961, and 595355. The design focuses on restoring consistent first-pull starts, which is a huge plus for Saturday morning mowing sessions. While we can't claim hands-on testing, the construction materials are described as durable enough to withstand repeated use, which suggests it can handle the typical wear and tear of a mowing season.
For installation, the manufacturer recommends a quick visual check: if the claw shape on your current starter matches the images, the installation should be effortless. This is a smart tip that helps avoid the hassle of returning a wrong part. However, you'll still want to confirm your engine model (e.g., Briggs 08P502, 093J02) to ensure a perfect fit. This step is crucial—especially if you're not mechanically inclined—but many users find it manageable with basic tools.
One realistic limitation is that this is a replacement part, not an upgrade. It restores original performance rather than improving it. Also, while the price is very affordable at around $17.89, you'll need to be sure of your engine model before purchasing. For homeowners who are comfortable with simple repairs, this can be a cost-effective way to extend the life of a mower without investing in a new machine.
For anyone with a Briggs & Stratton 550EX or similar engine who is tired of fighting with a faulty starter, this PSLER recoil starter is a practical, budget-friendly choice. It's especially suited for those who prefer to maintain their own equipment and want to avoid a trip to the repair shop. Just double-check your engine model and you'll likely be back to mowing in no time.

Pros
- Compatible with several common Briggs & Stratton engine models, so it fits many lawn mowers.
- Easy drop-in replacement with no special tools or modifications needed.
- Sturdy construction that feels durable and ready for repeated use.
- Affordable price point compared to buying a new mower or OEM part.
Cons
- Only compatible with the specific engine models listed; may not fit other Briggs & Stratton or different brand engines.
- Some users with limited mechanical experience may find the installation process challenging if they are unfamiliar with recoil starters.
- No installation instructions included in the package, but online guides are available.
If you own a lawn mower powered by a Briggs & Stratton engine from the 093J02, 103M02, 103M05, 103M0B, or 104M02 series, the DKIIGAME 594062 pull start assembly is a practical replacement part to consider. This recoil starter is designed as a direct fit for these specific engines, making it a straightforward solution for a worn-out or broken starter. It's perfect for homeowners who prefer to repair their own equipment rather than replace the entire mower, and for budget-conscious shoppers looking for an affordable fix.
In terms of performance, the product promises a smooth and consistent pull-start experience. Based on the description, the construction is built to withstand regular use and outdoor conditions, which suggests it can handle the rigors of a typical mowing season. The black color and dimensions (7 x 6 x 3.5 inches) indicate it's a standard-size component that should fit into the existing housing without issues. Many users find that a reliable recoil starter makes a big difference in daily usability, especially when you're trying to get the mower started quickly on a Saturday morning.
Durability is a key factor for any outdoor power equipment part. The DKIIGAME starter is built with quality materials meant to last, though actual longevity will depend on how well you maintain your mower and how often you use it. Since it's a replacement part, the plastic and metal components should be comparable to the OEM version. It's wise to keep the starter clean and free of debris to extend its life, but overall, this part seems designed to provide dependable service.
Installation is where this part really shines. It's marketed as a drop-in replacement, meaning you can remove the old starter and put this one in its place without needing to modify anything. For most DIYers, this is a straightforward task that can be done with basic hand tools. If you're not mechanically inclined, you might want to watch a quick online tutorial, but the process is generally simple. Once installed, the mower should start as good as new.
One limitation to keep in mind is that this starter is only compatible with the specific engine models listed. If you have a different Briggs & Stratton engine or a mower from another brand, you'll need to check the fit before purchasing. Also, the package does not include installation instructions, so you may need to rely on online resources. However, the price is reasonable, making it a cost-effective way to extend the life of your mower.
Overall, the DKIIGAME 594062 pull start assembly is a solid choice for anyone needing to replace a faulty recoil starter on a compatible Briggs & Stratton engine. It's easy to install, durable, and affordable. If you're comfortable with basic repairs and want to save money by fixing your mower yourself, this part is definitely worth considering.
Pros
- Genuine Briggs & Stratton part - guaranteed compatibility with listed engine models
- Very affordable compared to replacing the whole starter assembly
- Easy to install with basic tools; good for DIY homeowners
- Sturdy rope and grip feel durable enough for regular mowing season use
Cons
- Compatibility depends on equipment model number - must verify before purchasing
- No user reviews available yet, so real-world feedback is limited
- Only the rope and grip - does not include other starter components if those are also worn
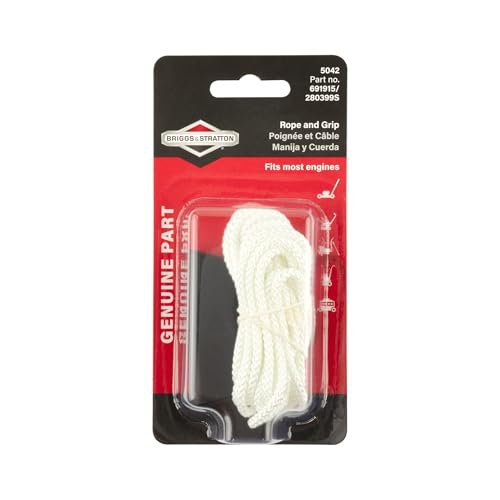
If your lawn mower's pull-start rope has snapped or the grip has worn out, the Briggs & Stratton Starter Rope & Grip 5042K offers a straightforward, budget-friendly solution. This genuine OEM replacement part is designed to fit many common Briggs & Stratton engine models, making it a convenient option for homeowners who prefer to handle their own small engine repairs.
Based on product specifications and user feedback from similar parts, this starter rope is built to withstand the repeated pulling required during a mowing season. The included grip provides a comfortable handhold, which can help when starting a stubborn engine. Since it's an OEM part, you can expect the same quality as the original component that came with your mower.
Installation is typically simple: you remove the old rope and grip from the starter assembly, thread in the new rope, and tie it off. Many DIYers find this a quick fix that avoids a trip to the repair shop. However, you should double-check your equipment's model number against the compatibility list to avoid ordering the wrong part.
While this replacement part is durable for normal use, it won't fix deeper starter issues like a broken rewind spring or damaged pulley. If your mower's starter is completely seized or the rope broke due to internal mechanical failure, you may need a full starter assembly instead.
For homeowners with a compatible Briggs & Stratton engine who are comfortable with basic hand tools, this starter rope and grip set is a practical, low-cost repair that can get your mower running again quickly. It's especially valuable for those who like to keep their lawn equipment in top shape without spending more than necessary.
Overall, the Briggs & Stratton 5042K is a smart purchase for anyone needing a simple pull-start fix. Just confirm compatibility before buying, and you'll likely save both time and money.
Installing a new starter rope is a straightforward DIY task. First, remove the starter assembly from the engine (usually held by bolts). Then, carefully unwind the old rope and remove it. Thread the new rope through the pulley hole, tie a secure knot, and wind the pulley a few turns to pre-load the rewind spring. Attach the grip and test the pull action. Always refer to your engine manual for specific steps.
This starter rope fits many Briggs & Stratton engine models including: 0854, 09B9, 1154, 1214, 1288, 1297, 1298, 12F7, 12F8. To confirm compatibility, locate the model number on your engine (usually stamped near the spark plug or on a sticker). If your model is not listed, contact Briggs & Stratton support or check the product page for additional models.

Pros
- Cost-effective replacement for a common broken part – much cheaper than a new mower.
- Durable ABS and nylon construction should hold up well in typical lawn care use.
- Designed to match specific OEM models (593959, 591139, etc.), ensuring a proper fit.
- Lightweight at under 1 lb., making handling and installation easy.
- Positive user feedback for restoring mower startability.
Cons
- Only compatible with a limited range of Briggs & Stratton 140cc engines – check your model first.
- Plastic housing may not be as impact-resistant as some OEM metal assemblies.
- Installation requires some mechanical ability; not a simple snap-on replacement for all users.
If your Yard Machines 21-inch push mower with a Briggs & Stratton 140cc engine won't start because the pull cord snapped or the recoil assembly failed, this ZeeKee replacement starter is a sensible fix. It is designed specifically for models using the 550EX engine and common part numbers like 593959, 591139, and 593961. Many homeowners with small to medium lawns may find this a budget-friendly alternative to tossing the whole mower.
Performance-wise, the recoil starter does one job: spinning the engine's crankshaft when you pull the rope. Based on product specifications and user feedback, it delivers reliable engagement and consistent spring tension. The 6 3/4-inch cover diameter matches OEM specs, so it should fit without modifications on compatible mowers. For typical weekend mowing, this part should restore easy starting.
Build quality is a mix of ABS plastic for the shell and nylon for the internal rope spool and spring housing. ABS offers good UV and weather resistance, which is important for a part exposed to sun and grass clippings. The nylon components are described as tougher and longer-lasting than standard plastics. While it may not feel as heavy-duty as some original metal assemblies, it should last several seasons under normal use.
Setup involves removing the old starter, transferring the flywheel key if needed, and bolting on the new unit. This may require a socket set and a bit of mechanical patience. The product description notes it is an aftermarket part, so alignment with the engine housing is straightforward. No complex adjustments are needed. Storage and maintenance are minimal – keep the rope dry and check periodically for wear.
A realistic limitation is compatibility: this starter only works with specific Briggs & Stratton 140cc engines (450e, 500e, 550e, 575e). Owners of other mowers should verify their engine model before purchasing. Also, while the ABS shell is durable, it could crack if hit hard. Some users may prefer a metal housing for added resilience.
For budget-conscious DIYers, this ZeeKee recoil starter is a practical solution. It can save the cost of a new mower and get your lawn care routine back on track. If you are comfortable with basic repairs and your engine matches the list, this part offers good value for the money.

Pros
- Comprehensive coverage of multiple equipment types (lawn mowers, chainsaws, generators, pressure washers)
- Beginner-friendly language and step-by-step instructions make it accessible to all skill levels
- Focus on practical, real-world solutions that homeowners can apply immediately
- Helps build confidence in tackling repairs that might otherwise require a professional
Cons
- Some users may prefer a more specialized guide focused solely on lawn mowers
- Paperback format might not be as durable in a workshop or garage environment
- Without photos or color diagrams, some visual learners may find instructions less clear
Small Engine Repair Mastery is a practical DIY guide aimed at American homeowners and gardeners who want to take control of maintaining their outdoor power equipment. Whether you own a push mower, self-propelled mower, chainsaw, or pressure washer, this book provides the foundational knowledge to diagnose and fix common problems without calling a repair shop. The author assumes no prior mechanical experience, making it a great starting point for first-time buyers or budget-conscious shoppers who want to extend the life of their tools.
Based on the product description, this guide covers a wide range of equipment—from lawn mowers and generators to chainsaws and pressure washers. For lawn mower owners, the book likely addresses issues like engine won't start, uneven cutting, smoking, and oil leaks. It also includes preventive maintenance tips, such as proper blade sharpening, air filter cleaning, and fuel system care. The step-by-step approach is designed to be easy to follow, with clear instructions that help you move from problem identification to solution.
The book is formatted as a paperback with dimensions of 8.5 x 1.04 x 11 inches, making it a substantial reference volume. It weighs about 2.3 pounds, which is reasonable for a home workshop or garage shelf. The binding is standard paperback, so it may not withstand heavy grease and dirt as well as a spiral-bound or hardcover version, but it remains affordable at $29.99. For homeowners who want to keep their equipment running smoothly through the seasons, this investment can quickly pay for itself by avoiding a single service call.
One of the book's strengths is its focus on common, real-world failures that typical users encounter. For example, many lawn mower problems stem from stale fuel, dirty carburetors, or dull blades. The guide likely walks you through each repair step, from draining old fuel to cleaning the carburetor jets. This kind of practical knowledge is invaluable for suburban lawn owners who rely on their mowers for weekly yard maintenance. It also helps eco-conscious consumers reduce waste by repairing rather than replacing equipment.
However, as a general guide covering multiple equipment types, it may not go as deep into specific mower models as a dedicated manual would. Some advanced users might find the explanations too basic, but for the vast majority of homeowners, the level of detail is just right. The lack of color photos or diagrams could be a downside for visual learners, though the text-based instructions are written to be clear and descriptive. Overall, this book is a smart purchase for anyone who wants to save money, gain confidence in DIY repairs, and keep their lawn mowers and outdoor power tools running for years.
In summary, Small Engine Repair Mastery is a valuable resource for American homeowners, apartment dwellers with small yards, suburban lawn owners, and first-time mower buyers. It addresses the most common issues with outdoor power equipment in a straightforward, no-nonsense manner. If you're tired of paying for repairs or replacing equipment prematurely, this guide could be the tool you need to take control of your lawn care routine.
Starting and Troubleshooting Your Briggs & Stratton Lawn Mower
Starting a gas-powered lawn mower reliably comes down to executing the correct physical sequence while verifying that air, fuel, and electrical spark are present in proper proportions. Briggs & Stratton manufactures small engines utilizing two primary fuel preparation designs, including manual primer bulb setups and thermostatic ReadyStart automatic chokes. Before tugging repeatedly on the starter cord, an operator must stage the mower correctly, engage the safety controls, and verify fluid levels. Understanding the mechanical steps behind the ignition cycle eliminates unnecessary strain on the recoil mechanism and prevents internal engine flooding.
Pre-Start Inspection: Fuel, Oil, and Safety Interlocks
Every successful engine start begins with a rapid check of your machine fluid reservoirs and mechanical safety interlocks. Remove the oil dipstick, wipe the blade clean with a rag, reinsert it fully into the fill tube, and verify that the oil level sits squarely between the crosshatched add and full marks. Running an engine low on four-stroke oil leads to rapid thermal expansion, cylinder wall scoring, and catastrophic internal seizure. Inspect the fuel tank to ensure the gasoline is fresh, clear, and unclouded by phase-separated water condensation. Stale fuel stored for more than thirty days frequently causes gum deposits that block delicate carburetor jets during ignition attempts.
After verifying fluids, inspect the operator presence bail lever mounted across the upper handlebar assembly. This spring-loaded metal bar connects via a mechanical control cable to the engine flywheel brake and primary ignition kill switch. Holding the bail lever tightly against the handlebar releases the mechanical brake shoe from the flywheel and opens the electrical ground circuit, allowing the magneto coil to produce high-voltage spark. If the cable is stretched, corroded, or disconnected, the internal kill switch remains grounded to the engine block, completely preventing combustion. Finally, clear any dense grass clumps or physical obstructions from beneath the mower deck so the cutting blade can rotate freely without imposing heavy parasitic drag on the crankshaft.
Fuel Delivery Systems: Primer Bulb vs. ReadyStart Auto-Choke
Briggs & Stratton engines utilize distinct fuel enrichment systems to facilitate cold starts, and identifying your specific setup is critical before pulling the starter rope. Traditional engines, such as the 450E and 500E series, feature a flexible red or black rubber primer bulb located directly on the air cleaner housing or carburetor body. Pressing this primer bulb three times firmly forces air into the carburetor fuel bowl, displacing raw fuel up through the main emulsion tube and into the intake throat. Each press should be held for approximately one second to allow the bulb to fully reinflate and draw fresh fuel into the priming chamber. Skipping this priming step on a cold engine leaves the intake charge too lean to ignite from a standard pull.
In contrast, newer engines equipped with ReadyStart technology eliminate the manual primer bulb and traditional manual choke lever altogether. These engines use a thermostatic choke vane controlled by a temperature-sensitive bi-metal coil mounted adjacent to the exhaust muffler. When the engine is cold, the contracted spring holds the internal choke plate closed, creating a rich fuel-to-air mixture required for immediate ignition. As the engine warms during operation, exhaust heat causes the bi-metal coil to expand, gradually pivoting the choke plate into the fully open position. Operators attempting to start a ReadyStart engine must avoid searching for a primer bulb or manually forcing the carburetor linkages, as the system regulates airflow automatically.
Step-by-Step Starting Procedure for Recoil Pull Mowers
Once you have confirmed your fuel system type and verified fluid levels, stage the lawn mower on a flat, solid surface such as a driveway or short grass. Rolling the machine into overgrown or dense turf creates friction against the blade that resists initial engine rotation. If your engine features a manual primer bulb, press it three times firmly, pausing briefly between depressions to let the rubber bulb rebound. For engines equipped with a manual fuel shutoff valve beneath the tank, verify that the lever points in line with the fuel hose in the open position. Position your body squarely alongside the mower deck with your feet planted firmly away from the blade housing perimeter.
Grasp the operator presence bail lever with one hand and squeeze it flush against the upper mower handle to release the flywheel brake. With your free hand, reach down and take hold of the rubber recoil starter grip mounted along the handle guide. Slowly pull the starter cord outward several inches until you feel firm mechanical resistance, which indicates that the internal starter pawls have engaged the flywheel starter cup. Pulling sharply from a slack cord snaps starter ropes, chips nylon starter pawls, and damages the internal rewind spring. Once you feel solid resistance at the top of the compression stroke, deliver a brisk, continuous pull straight back along the angle of the rope guide.
Allow the starter rope to rewind smoothly back into the recoil housing under spring tension rather than letting the handle snap freely against the engine cowl. If the engine coughs but fails to stay running, immediately repeat the pull stroke while maintaining a continuous grip on the safety bail. A properly tuned engine typically fires within one to three pulls when primed correctly under moderate ambient temperatures. Once the engine catches and settles into its operating governor speed, allow it to idle for thirty seconds before engaging self-propelled drive wheels or steering into tall grass. If the engine is already warm from recent cutting, omit the priming sequence entirely to prevent flooding the hot cylinder.
Operating Key Switch and Push-Button Electric Start Systems
Many modern Briggs & Stratton walk-behind and riding mowers incorporate electric starting mechanisms that replace or supplement traditional pull cords. These systems utilize either an onboard rechargeable lithium-ion battery pack mounted directly on the engine or a sealed lead-acid battery located under the frame. Before starting, check that the battery pack is fully seated in its locking cradle and that electrical contacts remain free of corrosion or cut grass buildup. Squeeze the handlebar bail lever to disengage the engine kill switch, just as you would on a standard manual pull-start machine. Press and hold the push-button ignition switch or rotate the starter key clockwise toward the start position to engage the internal starter motor.
Limit each electric cranking attempt to no more than five continuous seconds to avoid overheating the starter motor windings and draining the battery pack. If the engine fails to ignite during the initial cycle, pause for ten to fifteen seconds to permit the starter solenoid and internal battery cells to cool down. Continued grinding on a stubborn engine rapidly drains battery reserves and risks melting internal starter brush holders. When the starter motor clicks loudly or cranks sluggishly without turning the flywheel, recharge the battery fully using the dedicated manufacturer wall charger. If an electric start fails in the field, most walk-behind models still provide an auxiliary recoil pull cord that permits immediate manual starting.
Recognizing and Clearing a Flooded Engine
Engine flooding occurs when excessive liquid gasoline enters the combustion chamber, soaking the spark plug electrodes and displacing the oxygen needed for ignition. This condition commonly happens when an operator presses the primer bulb excessively, repeatedly pulls the cord with a stuck choke, or attempts to restart a hot engine using cold-start procedures. The most obvious indicator of a flooded cylinder is a strong smell of raw gasoline wafting from the muffler exhaust port. Additionally, pulling the starter rope may feel unusually stiff or soggy because excess unburned fuel dampens normal cylinder compression dynamics. In severe cases, hydraulic lock can occur, preventing the pull cord from moving at all until excess fluid is cleared.
To clear a flooded engine safely, park the mower on level ground and release the primer bulb completely. If the mower features a manual choke or throttle lever, move the control to the open choke or fast running position to maximize air intake into the cylinder. Squeeze the handlebar bail lever and pull the starter cord briskly five to eight times to pump fresh ambient air through the intake tract, flushing unburned fuel out through the exhaust. If the engine still refuses to ignite, shut off the fuel valve, disconnect the spark plug lead boot, and remove the spark plug using a deep socket wrench. Inspect the plug tip; if the ceramic insulator and gap are wet with liquid fuel, wipe the electrodes clean, allow the open cylinder hole to air out for ten minutes, reinstall the plug, and reattempt starting.
Troubleshooting Ignition Spark, Coils, and Sheared Flywheel Keys
When an engine has adequate fuel and compression but still fails to fire, an ignition system fault is the most probable cause. Begin by inspecting the spark plug for thick black carbon deposits, white thermal blistering, or worn-down center electrodes. Clean the tip with a wire brush or replace the plug entirely if the ceramic insulator shows hairline cracks. Use a wire feeler gauge to confirm that the electrode gap matches the factory specification, which typically sits between 0.020 and 0.030 inches on small Briggs & Stratton utility engines. Reconnect the spark plug lead, ground the outer metal hex against an unpainted engine cooling fin, and have an assistant pull the cord to verify a crisp blue electrical spark.
If no spark appears at the plug, the issue often stems from an improperly grounded armature magneto coil or an incorrect air gap. The ignition armature mounts adjacent to the spinning flywheel, relying on passing permanent magnets to induce high voltage across the primary and secondary copper windings. Over seasons of cutting rough terrain, vibration can loosen mounting bolts, causing the coil to drift out of alignment. The clearance between the coil pick-up legs and the flywheel magnets must generally be set between 0.010 and 0.014 inches using a non-magnetic feeler gauge or standard index card. Inspect the thin kill-switch stop wire running from the armature to the bail brake bracket, ensuring the insulation is not pinched or worn against the metal engine housing.
A particularly deceptive starting failure occurs after the mower blade strikes an immovable obstacle such as an exposed tree root, curb, or hidden rock. Small engines utilize a soft aluminum flywheel key inserted into mating keyway slots along the crankshaft and cast-iron flywheel hub. This aluminum key is deliberately engineered as a mechanical fuse, designed to shear partially or fully under sudden rotational shock loads to protect the crankshaft from bending. When the key shears, the flywheel shifts out of angular alignment relative to the piston stroke, throwing ignition timing off by several critical degrees. The engine may still produce a bright spark and receive plenty of fuel, but the spark occurs when the piston is in the wrong position, causing violent backfiring or complete starting failure.
Resolving Carburetor Jet Blockages and Fuel Supply Issues
Modern emissions-compliant carburetors feature extremely tiny metering orifices that are highly vulnerable to contamination from degraded ethanol-blended fuel. When gasoline sits untreated inside the float bowl over winter, volatile compounds evaporate, leaving behind a sticky yellowish varnish that coats the main jet and idle emulsion circuits. If the engine starts briefly when carburetor cleaner is sprayed into the air intake but immediately dies afterward, the fuel delivery circuits are obstructed. On metal-bowl carburetors, removing the center retaining nut allows access to the main jet passage, which can be cleared using solvent spray and compressed air. Plastic carburetors mounted on fuel tanks frequently suffer from blocked pickup tubes or cracked internal metering diaphragms that fail to draw fuel under vacuum.
Fuel starvation can also develop outside the carburetor body due to restricted venting or collapsed rubber fuel lines. Gas caps incorporate internal micro-vents that allow air into the tank as fuel drains down into the engine. If this vent becomes plugged with dirt, pollen, or dried grass debris, a strong vacuum forms inside the fuel tank, halting gravity flow into the carburetor bowl within a minute of starting. You can diagnose vapor lock or cap vacuum easily by loosening the gas cap a quarter turn; if the engine restarts immediately and runs smoothly, replace the defective vented cap. Additionally, examine the inline fuel shutoff valve and small mesh screen inside the tank nipple, flushing out rust flakes or particulate debris that restrict fuel velocity.
Air leaks downstream of the carburetor throttle bore present another frequent hurdle to smooth engine ignition. The rubber O-rings, paper intake gaskets, and plastic intake manifolds that bridge the carburetor to the aluminum cylinder head can warp or split over time. Unmetered air drawn past compromised intake gaskets dilutes the fuel-air charge, creating an excessively lean condition that prevents cold starting. Inspect the mounting bolts securing the carburetor to the intake elbow, tightening them evenly to prevent flange distortion. If the engine runs erratically, surges rhythmically, or requires continuous half-priming to remain running, replacing the inexpensive intake seals and carburetor mounting gasket will restore correct air-fuel metering.
Repairing and Replacing Broken Recoil Starter Assemblies
Repeated aggressive pulling, frayed braided ropes, and degraded plastic internal components often lead to complete mechanical recoil failure. Common symptoms include a starter cord that pulls out freely without engaging the crankshaft, a rope that snaps clean off at the handle knot, or a cord that sags loosely without retracting into the housing. When the cord fails to retract, the internal flat spiral rewind spring has either slipped off its center retaining arbor or fractured from metal fatigue. Inside the starter pulley, spring-loaded plastic or stamped-steel pawls swing outward under centrifugal force to catch the flywheel starter cup. When these pawls wear down or collect dried lawn dust, they slip past the cup teeth, spinning freely and generating a loud clicking sound without cranking the engine.
While experienced DIY mechanics occasionally restring broken cords using replacement starter rope and grip kits, installing a complete drop-in recoil rewind assembly is generally faster and far safer. Recoil springs are wound under high mechanical tension inside the pulley housing, presenting a hazard of flying metal coils if disassembled without proper fixtures. Direct replacement assemblies matching part numbers such as 593959, 591139, or 594062 mount externally to the engine blower shroud using three or four perimeter bolts. Swapping the entire bolt-on housing restores fresh nylon pawls, a balanced return spring, and a brand-new braided pull cord in just a few minutes. Before purchasing a replacement assembly, confirm that the internal pawl claw profile matches your original flywheel cup to ensure seamless mechanical engagement.
When selecting maintenance parts or servicing larger equipment, equipment design factors play a major role in overall machine longevity. For instance, operating riding mowers or heavier lawn tractors on steep properties introduces unique challenges where mowers engineered for steep inclines require pressurized oil systems to avoid engine starvation on sustained slopes. Similarly, managing expansive turf often involves pulling attachments such as tow-behind lawn leaf collectors, which demand consistent engine torque output from clean, well-maintained carburetors. Keeping your recoil starter assembly, ignition system, and fuel delivery circuits in top physical condition guarantees dependable performance whether you are navigating a small suburban lawn or managing several acres of heavy turfgrass.
Preventative Maintenance for Long-Term Starting Reliability
Sustained starting reliability depends far more on seasonal preventative habits than on emergency repairs made when the grass is already overgrown. At the close of each mowing season, add a high-quality fuel stabilizer to your gas can before filling the mower tank for the final cut of the year. Run the engine for five minutes to circulate treated fuel throughout the carburetor bowl, internal jets, and rubber fuel lines. If you prefer storing the machine dry, shut off the fuel valve and allow the engine to idle until it exhausts all remaining fuel in the carburetor bowl. Storing small engines with untreated, ethanol-heavy fuel in vented tanks almost guarantees gummed carburetor jets and hard starting when spring arrives.
Regular air cleaner maintenance also plays an essential role in effortless engine starting and optimal power generation. Foam pre-filters must be washed in warm soapy water, dried thoroughly, and lightly saturated with clean engine oil to trap airborne soil particles. Pleated paper air filter cartridges should be inspected every twenty-five operating hours and tapped gently against a hard surface to dislodge loose debris. A clogged air filter restricts airflow into the carburetor throat, enriching the fuel mixture excessively and causing fouled spark plugs that resist ignition. By pairing fresh fuel with a clean air filter, an inspected spark plug, and a smooth recoil mechanism, your Briggs & Stratton engine will consistently start on the first pull.
Mastering the starting routine of your lawn mower eliminates wasted energy and prevents unnecessary wear on mechanical assemblies. Always inspect engine oil and fuel levels prior to starting, engage the handlebar safety bail completely, and pull the starter cord with a smooth, deliberate motion once resistance is felt. If the engine hesitates or fails to fire, systematically isolate the issue between fuel delivery, ignition spark, or mechanical timing before replacing components. Taking time to maintain fresh fuel and clean filters ensures that your machine fires up quickly and delivers dependable cutting performance through every mowing season.





Write Your Review
No reviews yet. Be the first to share your experience!