


A dull mower blade is the most common cause of ragged grass edges and uneven cuts, and the solution usually involves either a drill-mounted corundum sharpener or a manual file, depending on the blade type and your available tools.
For most rotary lawn mowers, the most effective method is using a lawn mower blade sharpener for drill that attaches to a standard power drill, as this allows for consistent speed and angle control. If you have a reel mower, a dedicated hand sharpener is the only correct choice. Understanding what to use to sharpen mower blades helps you avoid damaging the cutting edge or creating an imbalance that strains your engine.
The choice of tool depends heavily on the material of the blade and the severity of the dullness. Corundum (alumina) stones are the industry standard for DIY sharpening because they are durable and effective on steel. You will also need a blade balancer to ensure the weight is distributed evenly after grinding, as an unbalanced blade can cause significant vibration. The options listed below cover both drill-powered kits for rotary mowers and manual tools for reel mowers, providing the necessary hardware to restore cutting performance without professional service.

Pros
- Very affordable price point for a sharpening tool
- Simple design makes it easy to use without special skills
- Durable construction from premium materials
- Works on both bed knife and reel blades in one tool
- Compact and easy to store when not in use
Cons
- Only works on reel mowers, not rotary or other mower types
- Requires manual effort and some patience to sharpen effectively
- May not fully restore blades that are severely damaged or nicked
The Ximoon SK-2 Reel Lawn Mower Hand Sharpener is a practical accessory for anyone who owns a manual reel mower. Unlike electric or gas mowers, reel mowers rely on sharp blades to cut grass cleanly, and dull blades can tear grass instead of slicing it. This sharpener is designed to help maintain that sharp edge without the need for professional tools or services.
Based on product specifications and user feedback, this sharpener includes two sharpening slots: one for the bed knife (the stationary blade) and one for the rotating reel blades. The instructions are straightforward: flip the mower upside down, place the appropriate slot over the blade, and slide back and forth with mild pressure. Many homeowners may find this process simple enough to do in a few minutes before each mowing season.
The build quality appears solid, with the sharpener made from premium materials that should withstand repeated use. Its compact size (3.4 x 2.6 x 1.5 inches) means it won't take up much space in your toolbox or garage. The green color is easy to spot, and the design feels sturdy in hand.
For setup, there's nothing to assemble—just take it out of the package and start sharpening. Maintenance is minimal: wipe clean after use and store in a dry place. The product description highlights that regular sharpening can help extend the life of your reel mower and improve cutting performance, which is especially useful for eco-conscious homeowners who prefer manual mowing for quiet, emission-free lawn care.
Realistic limitations include that this sharpener is only compatible with reel mowers—it won't work on rotary blades, string trimmers, or other equipment. Also, while it can restore a moderate dull edge, severely damaged or bent blades may need professional attention. Some users find that achieving a perfectly even sharpness requires a bit of practice.
Overall, the Ximoon SK-2 is a budget-friendly solution for reel mower owners who want to keep their equipment in top shape. If you already use a reel mower and want to maintain its cutting efficiency without spending much money or time, this sharpener is a worthwhile addition to your lawn care toolkit.
Sharpening the bed knife blade: Flip the reel mower upside down. Invert the sharpener so the bed knife slot is placed over the cutter bar. Applying mild pressure, slide the sharpener back and forth, carefully rotating the reel as needed to allow the sharpener to move along the full length of the bed knife blade.
Sharpening the reel blades: Place the sharpener onto the reel blade so the rotating arms are both slotted over the blade. Applying mild pressure, run the sharpener back and forth over the full length of the blade. The rotating arms will follow the curvature of the blade.
Repeat these steps for all blades until the edges feel sharp. Wipe the sharpener clean after each use and store in a dry place.
Pros
- Quick and simple attachment to any standard drill – sharpens blades in seconds without removing them from the mower (if accessible)
- Corundum material is extremely durable and won't wear down quickly, offering consistent sharpening performance over time
- Includes a blade balancer that helps reduce vibration and prolongs mower engine life – a thoughtful addition at this price point
- Versatile enough to sharpen multiple yard tools beyond just mower blades, adding value for money
Cons
- May not work well on heavily damaged or extremely dull blades that require professional reshaping
- Balancer only fits blades with a center hole – some specialty or offset blades may not balance properly
- Users will need to exercise caution to avoid over-sharpening or creating an uneven edge, especially without prior experience
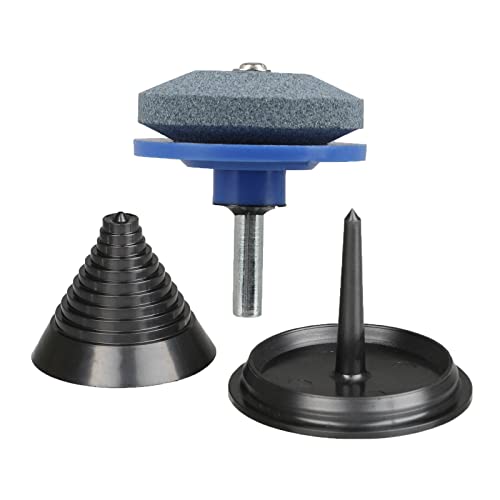
If you're a homeowner who mows their own lawn, keeping your mower blades sharp is one of the simplest ways to improve cut quality and reduce engine strain. The jtfrkope Lawn Mower Blade Sharpener and Balancer Set offers a budget-friendly way to do just that. Designed to work with any standard drill, this corundum sharpener quickly restores a factory-sharp edge to dull blades, while the included balancer helps eliminate vibration after sharpening. It's an ideal accessory for anyone from first-time buyers to seasoned lawn care enthusiasts who want to extend blade life without spending money on replacements or professional sharpening.
In real-world use, this sharpener shines in speed and convenience. Instead of labor-intensive manual filing, you simply insert the sharpener into your drill and guide it along the blade edge. The double-layer corundum stone sharpens both sides at once, and the angled surfaces help maintain a proper cutting angle. While you won't get a mirror finish like a professional grinder, most homeowners will notice an immediate improvement in cutting performance – grass is sheared cleanly rather than torn, which leads to a healthier lawn. The blade balancer is equally straightforward: place the blade on the cone, and if it tilts, you know more material needs to be removed from the heavy side. This step is crucial for preventing vibration that can damage your mower's spindle bearings and engine over time.
Build quality is a highlight for such an affordable product. The corundum material is dense and heat-resistant, so it won't degrade quickly even with repeated use. The sharpener feels solid and the grinding surface stays flat. The balancer is a simple plastic cone that works reliably for standard blades with a center hole. However, if you have offset or non-standard blades, it may not be perfectly centered. The entire set is compact and easy to store – fits in a tool drawer or a small corner of the garage. No batteries or electricity needed beyond your drill, making it a low-maintenance addition to your toolkit.
Setup is as easy as it gets: attach the sharpener to your drill chuck, tighten, and you're ready to go. The learning curve is minimal – watch a quick video or follow the simple instructions. That said, it's important not to press too hard or linger too long on one spot, as you can heat the blade and ruin its temper. A light touch and steady passes work best. The balancer helps ensure you remove material evenly. Maintenance is straightforward: just wipe the sharpener clean after use – no oiling or special care required.
One realistic limitation is that this sharpener won't fix deeply nicked or badly warped blades. For those cases, you'll still need to replace the blade or take it to a pro. Also, because the sharpener mounts on a drill, you have to remove the blade from the mower first – so it's not an on-the-fly tool. But given the price, it's a practical trade-off. Some users may want a guide to keep the sharpening angle consistent, but with practice you'll develop a feel for it.
Overall, this set is a smart purchase for any U.S. homeowner who mows their lawn and wants to maintain their equipment without frequent blade replacements or service bills. It's especially well-suited for budget-conscious shoppers, DIYers, and those with small to medium-sized yards who mow monthly. While it's not a heavy-duty professional tool, it delivers reliable performance for routine blade maintenance. If you're looking to save money and keep your mower running smoothly all season, this sharpener and balancer set is a worthwhile addition to your lawn care arsenal.
Pros
- Very affordable solution for blade maintenance
- Simple to install and use with any standard drill
- Works on a wide range of blades beyond just mowers
- Sturdy construction from double-layer corundum
Cons
- May not be suitable for very thick or hardened blades
- Requires a drill and some manual effort for best results
- Limited to sharpening only the cutting edge, not for reshaping severely damaged blades
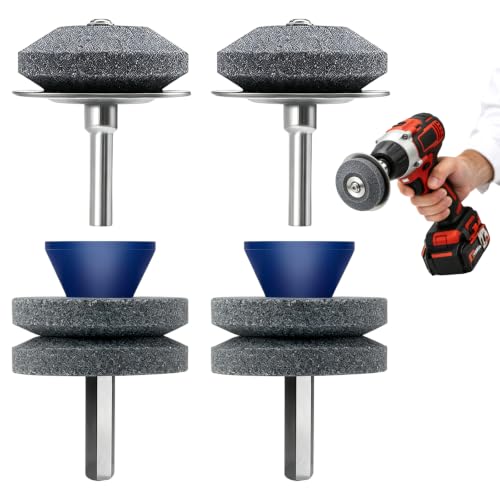
Keeping your lawn mower blades sharp is one of the most important steps for a clean, healthy lawn. Dull blades tear grass instead of cutting it, leaving ragged edges that turn brown and invite disease. The Bneykrir 4Pcs Lawn Mower Blade Sharpener offers a simple, low-cost way to maintain your blades right at home using any power drill you already own.
This set includes four sharpening stones made from double-layer corundum, a material known for its hardness and durability. Each stone is designed to mount quickly onto your drill's chuck—installation takes about 10 seconds. Once attached, you run the spinning stone along the edge of your mower blade to restore a sharp cutting surface. Based on user feedback, this method is effective for most standard lawn mower blades, including those on push mowers, riding mowers, and even tractor blades.
The sharpener is lightweight and compact, making it easy to store in a toolbox or garage drawer. Because it comes as a 4-pack, you have extras to keep in your shed, share with a neighbor, or use for different tools. The corundum construction holds up well over multiple uses, though like any abrasive stone, it will eventually wear down with heavy use.
One of the biggest advantages is the cost savings. Instead of paying for professional sharpening or buying new blades every season, you can touch up your blades in minutes. This is especially useful for homeowners who mow frequently and want to maintain peak cutting performance without a big investment. The process also helps keep your blades balanced, which reduces vibration and wear on your mower's engine.
However, there are some limitations. This sharpener is best for routine maintenance on moderately dull blades. If your blades are deeply nicked, bent, or heavily worn, you may need to replace them or use a grinder first. Also, while the product works with any drill, achieving a consistent edge takes a steady hand and some practice. It's not as precise as a dedicated sharpening guide or professional service.
Overall, the Bneykrir blade sharpener is a practical choice for the budget-conscious homeowner who wants to keep their mower running efficiently. It's easy to use, versatile, and delivers good results for the price. If you're looking for a no-fuss way to extend the life of your blades and get a better cut, this set is worth adding to your lawn care toolkit.

Pros
- Quick and easy blade sharpening with any drill, saving time compared to manual filing.
- Includes both coarse and fine grit stones for efficient restoration and finishing.
- Blade balancer helps eliminate vibration, extending mower lifespan and improving cut quality.
- Compact and portable kit with storage case, ideal for home use or on-the-go maintenance.
- Versatile enough to sharpen various garden tools beyond mower blades.
Cons
- May require practice to achieve consistent sharpening angle on curved or large blades.
- Balancer only fits blades with a center hole between 5/8 and 1.5 inches, so some specialty blades may not work.
- Storage case is basic and may not withstand heavy shop use over time.
If you own a lawn mower, you know that a sharp blade makes all the difference in cut quality and engine efficiency. The cenoz 5-Piece Lawn Mower Blade Sharpener Kit is designed for homeowners who want to keep their blades in top shape without spending a lot on professional sharpening services or bulky bench grinders. This kit includes four sharpening stones and a blade balancer, all packed in a compact storage case that fits easily in a garage or shed.
Based on the product description, the sharpening stones are made from industrial-grade corundum, a material known for its hardness and wear resistance. The dual-layer design combines a coarse grit for removing rust and nicks with a fine grit for finishing, so you can restore a dull blade to razor-like sharpness in just a few passes. The universal 1/4-inch shank fits any standard power drill or hand drill, making it easy to attach and use. Many homeowners may appreciate how quickly this setup works compared to manual filing—it can turn a tedious chore into a 10-minute task.
Included in the kit is a blade balancer that works with blades having a center hole from 5/8 to 1.5 inches. Balancing your blade after sharpening is crucial because even a small imbalance can cause vibration, leading to premature wear on mower bearings and an uneven cut. This balancer lets you check and correct balance easily, which helps protect your mower and ensures a smoother, more professional-looking lawn.
The kit is also versatile beyond mower blades. According to the features, you can use the stones on garden shears, rototiller blades, sickles, and other cutting tools. The compact size and corrosion-resistant materials make it suitable for outdoor use and storage. The included storage case keeps all five pieces organized, so you won't lose small parts between uses.
One realistic limitation is that sharpening by hand with a drill attachment requires some practice to maintain a consistent angle, especially on curved or wide blades. Also, the balancer may not fit every blade type—if your mower uses a blade with a non-standard center hole, you might need a different balancing solution. The storage case is functional but basic, and may not hold up to heavy shop abuse over years.
Overall, this kit is a practical, budget-friendly option for DIY lawn care enthusiasts who want to keep their mower blades sharp without investing in expensive equipment. It's especially well-suited for homeowners with one or two mowers who don't mind spending a few minutes on maintenance. If you value convenience, portability, and cost savings, the cenoz sharpener kit is worth considering.

Pros
- Adjustable sharpening angle (15-45 deg) covers most common blade bevels
- Ball bearings in the handle provide smooth, low-friction operation
- Sturdy metal build feels durable enough for regular use
- Compatible with both left and right hand blades for versatility
Cons
- Requires an angle grinder (not included), so additional tool needed
- No user reviews yet, so real-world feedback is limited
- Maximum blade width of 78mm may not fit very wide or oversized blades
If you keep a lawn mower running year after year, you know dull blades tear grass instead of cutting it clean. That leads to browning, uneven growth, and more stress on your engine. The Peuxmall Lawn Mower Blade Sharpener offers an easy way to sharpen blades at home using a standard angle grinder. This tool suits homeowners who prefer to maintain their own equipment rather than paying for professional sharpening or replacing blades every season.
The standout feature is the adjustable frame that lets you set the sharpening angle anywhere from 15 to 45 degrees. That covers most common lawn mower blades—rotary, mulching, standard steel blades. You simply clamp the sharpener onto your blade, set the desired angle, and run your angle grinder along the guide. According to the product description, the ball-bearing handle reduces friction during use, which should make the sharpening process smoother and extend the life of both the tool and your blades.
Build quality appears solid, with premium-grade metal construction that feels sturdy in hand. The black finish resists rust, and the compact dimensions (9 x 8 x 4 inches, weighing 2.8 pounds) mean it won’t take up much space in your garage or shed. There’s no assembly required out of the box—just attach your angle grinder and you’re ready to go. The tool is designed for both right- and left-handed blades, so you don’t have to flip your mower blade awkwardly.
One practical limitation: you do need an angle grinder to use this sharpener. If you don’t already own one, that’s an extra purchase. Also, the maximum blade width is 78mm (about 3 inches), which fits most residential mower blades but may not work for extra-wide or commercial-grade blades. Since there are no user reviews yet, it’s hard to gauge long-term durability under heavy use, but the materials and ball bearings suggest decent reliability.
For U.S. homeowners looking to save money and keep their mower cutting efficiently, this sharpener looks like a solid investment. It’s especially useful for those with a few different mowers or blade types, since the adjustable angle and left/right compatibility eliminate the need for multiple sharpeners. Just remember to wear safety glasses and follow angle grinder precautions.

Pros
- Includes four different sharpeners for versatility across blade conditions
- Double-layered design provides a finer finish than single-stage sharpeners
- Metal sharpeners offer durability for heavy-duty sharpening sessions
- User-friendly operation—no specialized training needed
Cons
- Requires a power hand drill, which not all homeowners may own
- May not effectively sharpen very large or heavily damaged blades without additional effort
- Limited user reviews make long-term quality difficult to assess based on feedback alone
The Guzmenu 4PCS Lawn Mower Blade Sharpener Kit is designed for homeowners who prefer a hands-on approach to lawn mower maintenance. Rather than relying on professional sharpening services or replacing blades frequently, this kit lets you use a standard power drill to restore a sharp edge. It's especially suited for budget-conscious DIYers who already own a drill and want a simple, cost-effective way to keep their mower blades in top condition.
In terms of performance, the kit uses two types of abrasives to tackle different blade conditions. The double-layered sharpeners first grind then hone the blade, which can produce a smoother finish compared to single-stage sharpeners. The metal sharpeners are built for tougher or more worn blades, offering the resilience needed for repeated use. According to the product description, this setup delivers a 'factory-sharp edge' quickly, which should improve cutting efficiency and reduce stress on the mower engine.
Build quality appears decent for a budget accessory. The double-layered abrasives are designed to reduce friction during sharpening, while the metal versions are made from robust materials. The kit includes four pieces, giving you options for different blade sizes and levels of wear. The compact dimensions (1.9 x 1.9 x 2.3 inches) make it easy to store in a toolbox or garage drawer. However, as with many drill attachments, the longevity depends on how often you use it and the condition of the blades you sharpen.
Setup and use are straightforward: attach the sharpener to your drill's chuck, secure the mower blade safely, and guide the spinning sharpener along the cutting edge. No special skills are required, though first-time users may want to watch a tutorial to ensure proper angle and pressure. Maintenance of the kit itself is minimal—just wipe clean after use. Since it doesn't require electricity or batteries, there's nothing to charge or oil.
One realistic limitation is that the kit is only as good as the drill you pair it with. A low-power or wobbly drill may produce inconsistent results. Also, while the metal sharpeners are durable, they may wear down over time with heavy use. Some users might find that very thick or damaged blades still need professional grinding. Additionally, with zero customer reviews at launch, real-world feedback is unavailable, so the claims about performance and durability should be taken with cautious optimism.
Overall, the Guzmenu blade sharpener kit is a practical option for the average homeowner who wants to maintain a sharp mower blade without extra expense. If you already have a drill and want to save on blade replacement costs, this kit offers a versatile set of tools. Just remember that proper technique and safety precautions are essential—secure the blade, wear gloves, and avoid over-sharpening. For those willing to put in a little effort, this kit can extend the life of your mower blades and keep your lawn looking its best.
For best results with the Guzmenu kit, always secure the mower blade in a vise or clamp before sharpening. This prevents movement and ensures a consistent edge. Start with the double-layered sharpener for routine touch-ups, and switch to the metal sharpener only for heavily worn or nicked blades. Maintain the original blade angle (usually 30-45 degrees) as you guide the drill along the edge. Avoid over-sharpening, which can thin the blade and reduce its lifespan. After sharpening, check for balance by hanging the blade on a nail or using a balancer—an unbalanced blade can cause vibration and poor cuts. Finally, clean the blade and sharpeners after each use to prevent rust and debris buildup.
Choosing the Right Sharpening Tool for Your Mower
The primary decision point is whether your mower is a rotary type with a spinning blade or a reel type with a rotating cylinder. Rotary mowers, which include most push, self-propelled, and riding models, use a single high-speed blade that cuts by shearing. These blades require a sharpener that can match the speed of the cutting edge.
Drill-mounted sharpeners are the standard here because a power drill provides the necessary RPM to grind metal efficiently. Reel mowers operate differently; they use a scissor-like action between the reel and the bed knife. These blades are much thinner and require a manual, low-speed hand tool to avoid overheating or bending the steel.
| Tool Type | Best For | Key Feature |
|---|---|---|
| Drill-Mounted Sharpener | Rotary Push/Riding Mowers | High speed, dual-layer grit |
| Manual Hand Sharpener | Reel Mowers | Low speed, precise slot fit |
| Angle Grinder with Guide | Heavy Rust/Deep Nicks | Adjustable angle, high power |
| Flat File | Minor Touch-ups | Manual control, no power needed |
When selecting a drill attachment, look for the grit composition and the shank size. Most consumer drills use a standard 1/4-inch shank, which fits the majority of kits found in the market. The grinding surface is typically made of corundum, which is harder than the steel used in mower blades.
Some kits include two types of stones: a coarse grit for removing rust and deep nicks, and a fine grit for polishing the edge. Having both allows you to restore a blade that has been neglected for a season without buying separate tools. The material durability is also a factor; industrial-grade corundum resists wear better than cheap composites, meaning the tool will last for multiple seasons of use.
For reel mower owners, the compatibility is specific. A sharpener designed for a rotary blade will not fit the thin, curved blades of a reel mower. You need a tool with a specific slot that matches the geometry of the reel blade. These manual tools are inexpensive and simple, often requiring just a sliding motion along the blade edge.
They are not interchangeable with rotary tools. If you own both types of mowers, you will need to purchase the specific tool for each, as the mechanics of the cut are fundamentally different. The manual tool is a precision instrument for a specific task, whereas the drill attachment is a power tool for a broader range of steel cutting edges.
Drill-Mounted Sharpeners vs. Manual Files
Drill-mounted sharpeners offer speed and consistency, which is why they are the preferred choice for most homeowners. The power drill removes the physical effort of filing, which can be tiring and inconsistent over a long blade. The attachment spins at high speed, grinding away metal quickly. This method is ideal for blades that are uniformly dull. However, it requires care to maintain the correct angle. If you hold the drill too steeply, you will remove too much metal from the top of the blade, shortening its life.
If you hold it too shallow, you will not remove enough metal to create a sharp edge. The drill provides the power, but your hand provides the precision. Manual files, on the other hand, give you complete control over the angle and pressure. They are slower but allow for very fine adjustments. A file is useful for touching up a single nick or for sharpening a blade that is only slightly dull. It is also the only option if you do not have access to a power drill or if you are in a remote location without power.
The decision often comes down to the condition of the blade. If the blade is rusted or has deep gouges, a file will take hours to remove the material. A drill sharpener with a coarse grit stone can clear this in minutes. If the blade is clean but just feels dull, a fine-grit file or a fine-grit drill stone will suffice. Many kits include both, allowing you to switch between them.
The dual-layer design found in some products combines both grits in one tool, using the coarse side for heavy work and the fine side for finishing. This is a cost-effective solution for DIYers who want to handle all levels of blade wear. The key is to match the tool to the job, using the most powerful tool necessary but not so powerful that you lose control.
Understanding Blade Angles and Geometry
The cutting angle of a mower blade is critical for performance. Most rotary mower blades are designed with a specific bevel angle, typically between 30 and 45 degrees. This angle determines how the blade shears the grass. If you sharpen the blade at the wrong angle, it will not cut cleanly. It may tear the grass instead of cutting it, leading to browning and slower recovery.
The goal is to replicate the original factory angle. This is why adjustable guides or specific tool designs are helpful. They help you maintain a consistent angle along the entire length of the blade. Without a guide, you are relying on feel, which can be inconsistent. A blade with an uneven angle will vibrate more and cut less effectively. Maintaining the correct geometry is as important as removing the dull metal.
Reel mower blades have a different geometry. They are thin and curved, designed to mesh with the bed knife. The sharpening angle is fixed by the tool’s slot. You simply slide the tool along the blade, and the slot ensures the correct angle is applied. This is why manual tools for reel mowers are so specific. They are not adjustable in the same way drill attachments are. The precision comes from the tool’s design, not the user’s skill.
For rotary blades, the user has more responsibility. You must hold the drill at the correct angle relative to the flat of the blade. Many users find it helpful to mark the angle on the blade with a marker before sharpening. This gives you a visual reference. You can then check your work by seeing if the ground area matches the marked area. This simple technique helps ensure consistency and prevents accidental over-sharpening.
The Importance of Blade Balancing
Sharpening a blade removes metal, but it does not always remove it evenly. If you remove more metal from one side of the blade than the other, the blade becomes unbalanced. An unbalanced blade causes vibration in the mower deck and the engine. This vibration can wear out bearings, loosen bolts, and even damage the mower’s frame over time.
It is a common mistake to sharpen a blade and put it back on without checking the balance. The balance is just as important as the sharpness. A sharp but unbalanced blade is worse than a dull but balanced one. The vibration can cause the mower to shake violently, making it difficult to control and potentially dangerous. Always check the balance after sharpening, no matter how careful you were with the angle.
Checking the balance is simple. You need a blade balancer, which is a small tool with a hole that fits the center hole of the blade. You place the blade in the balancer and let it rest. If the blade stays level, it is balanced. If one tip drops, that side is heavier. You need to remove a small amount of metal from the heavier side to balance it. You can use a file or a drill sharpener for this, but you must be very careful to remove only a tiny amount.
Re-check the balance after each small removal. This process ensures that the blade spins true. Many sharpening kits include a balancer, which is a valuable addition. It allows you to complete the job properly. If your kit does not include one, it is worth buying separately. The cost is low, and the benefit to your mower’s longevity is high. Balancing is a non-negotiable step in the sharpening process.
Material Considerations: Corundum vs. Diamond
The grinding material is the heart of the sharpener. Corundum, also known as alumina, is the most common material for DIY mower blade sharpeners. It is hard, durable, and effective on steel. It is less expensive than diamond, making it a good choice for regular maintenance. Diamond-coated sharpeners are harder and can last longer, but they are more expensive. They are also more aggressive, which can be a risk if you are not experienced. For most homeowners, corundum is the right choice.
It provides enough cutting power to sharpen blades effectively without the risk of over-grinding. The grit size of the corundum also matters. Coarse grit (around 60-80) is for heavy removal, while fine grit (around 120-220) is for finishing. A dual-layer stone combines both, offering versatility. The material should be resistant to wear and corrosion, ensuring it lasts for many seasons. Check the product description for the grit size and material grade to ensure you are getting a quality tool.
Some sharpeners use ceramic or other composites. These can be effective but may wear down faster than industrial-grade corundum. The key is to look for products that specify the material and grit. Avoid generic descriptions that do not provide details. A high-quality sharpener will last for years, while a low-quality one may wear out after a few uses. The cost difference is usually small, so it is worth investing in a durable tool.
The sharpness of the blade depends on the quality of the grinding surface. A worn-out sharpener will not produce a sharp edge, no matter how much you grind. So, replacing the sharpener when it wears out is part of the maintenance process. Most corundum stones last for several seasons of regular use, which makes them a cost-effective option for DIY sharpening.
Safety Precautions and Setup
Sharpening a mower blade involves rotating metal and power tools, so safety is essential. Always wear safety glasses to protect your eyes from metal shavings and debris. The grinding process can throw small particles at high speed. A face shield is also a good idea, especially when using a drill. Wear sturdy gloves to protect your hands from the sharp edge of the blade. The blade is heavy and can slip, so handle it with care.
Secure the blade in a vise or clamp it to a workbench before sharpening. Never hold the blade by hand while using a drill sharpener. The torque from the drill can twist the blade, causing injury. Use a C-clamp or a dedicated blade holder to keep it stable. This ensures that the blade does not move during grinding, which is crucial for both safety and accuracy. The setup should be stable and secure before you start the drill.
Ensure that the area is well-ventilated if you are using a sharpener that produces dust. Metal dust can be harmful if inhaled, so work in a garage or outdoors. Keep the area clear of clutter so you have room to move. Have a fire extinguisher nearby if you are using a tool that can produce sparks, though this is less common with corundum sharpeners. Always read the manufacturer’s instructions for the sharpener and the drill.
Some drills have specific speed settings that are better for sharpening. A lower speed may give you more control, while a higher speed is faster but harder to manage. Experiment to find the setting that works best for you. Safety is not just about protecting yourself; it is also about protecting your tools and your mower. A careful setup prevents accidents and ensures a better result. Take the time to prepare properly, and the sharpening process will go smoothly.
Step-by-Step Sharpening Process
Once you have the right tool and have set up safely, the sharpening process follows a logical sequence.
- First, remove the blade from the mower, which is essential for safe and accurate sharpening.
- The blade is usually held by a single bolt, but it may have a washer or a retaining clip.
- Use the correct socket wrench to remove the bolt, being careful as the blade is heavy and can drop.
- Place the blade in a vise, clamping the flat side, not the cutting edge, to protect the edge from damage.
- If you do not have a vise, you can use a sturdy block of wood and clamps to keep the blade stable and secure.
- Next, inspect the blade for any damage, such as cracks or deep nicks, before proceeding to sharpening.
- If there are cracks, the blade should be replaced, not sharpened, because sharpening a cracked blade is dangerous.
Attach the sharpener to the drill. Ensure it is tight and secure. Start the drill at a low speed to test the setup. Then, increase to a medium speed. Hold the drill at the correct angle, matching the original bevel. Move the drill along the blade in a smooth, continuous motion. Do not stop and start; keep the motion consistent. Sharpen the entire length of the blade evenly. Then, flip the blade and sharpen the other side.
This ensures that both sides are sharp and balanced. After sharpening, check the balance using a balancer. If one side is heavier, remove a small amount of metal from that side. Re-check until it is balanced. Finally, clean the blade with a rag to remove any metal shavings. Reinstall the blade on the mower, tightening the bolt to the manufacturer’s specification. The process is straightforward, but attention to detail is key to a good result.
- Remove the blade and secure it in a vise or clamp.
- Attach the drill sharpener and check the tightness.
- Sharpen the blade at a consistent angle and speed.
- Flip the blade and sharpen the opposite side evenly.
- Check the balance and adjust if necessary.
- Clean the blade and reinstall it on the mower.
Maintenance and Storage Tips
Proper maintenance of your sharpening tools extends their life and ensures consistent performance. After each use, clean the sharpener to remove metal shavings and dust. A brush or a compressed air can helps clear the grit. Store the sharpener in a dry place to prevent rust. Corundum stones are durable, but the metal shank can rust if exposed to moisture. A light coat of oil on the metal parts can prevent corrosion.
If you use a drill, keep the battery charged and the drill clean. A well-maintained drill provides consistent power, which is important for sharpening. Check the drill bit holder for wear and replace it if necessary. The sharpener should fit snugly in the holder. A loose fit can cause the sharpener to wobble, leading to uneven sharpening and potential injury. Regular inspection of your tools is part of good maintenance.
For the mower blade itself, regular sharpening is key to a healthy lawn. A dull blade tears the grass, making it susceptible to disease. Sharpen the blade at least once a season, or more often if you mow frequently. If you notice the grass browning or the mower working harder, it is time to sharpen. Keep a record of when you sharpened the blade. This helps you plan maintenance.
Storing the blade properly is also important. If you are not using the mower, remove the blade and store it in a dry place. This prevents rust and damage. A blade stored properly will last for many years. The cost of sharpening is low compared to the cost of replacing a blade or repairing a mower damaged by a dull or unbalanced blade. Regular maintenance is a small effort that saves time and money in the long run.
Choosing the right tool and following a consistent process ensures that your mower blades stay sharp and balanced. Whether you use a drill-mounted sharpener or a manual file, the goal is the same: a clean cut and a healthy lawn. The options available cover a range of needs and budgets, from basic files to advanced drill kits. By understanding the differences and following the safety and maintenance tips, you can handle blade sharpening yourself with confidence.
A sharp blade makes mowing easier and more effective, and it extends the life of your mower. Take the time to do it right, and you will enjoy the benefits for many seasons to come. If you are looking for related maintenance topics, our guide on battery-operated mower performance offers insights into how power sources affect overall upkeep.



Write Your Review
No reviews yet. Be the first to share your experience!